Sampler is one of the most versatile and useful tools in the Ableton arsenal. While using it to trigger samples is useful, mastering it unlocks so much to create unique and memorable production. We know what it is like to look at all the extra windows of a sampler and think “what do I do with this?” and then retreat back to the normal sampling techniques. However, someone who can master the full power of the instrument can add so much more flexibility to their production, especially if you subscribe to a sample client like Splice.
In this article, we’ll show you 6 ingenious new techniques you can use in your productions to add a little extra flavor, spice and experimentation to your productions.
1. The LFO “Wobble ”
One of the best options for getting the full power out of Sampler is creating wobble effects with its filter modulation system.

Sampler has many tabs available for its use. The ones that you will need for this technique are the Modulation and Filter/Global tabs shown above. Simply turn on one of the LFO modules above and select the “Type” of waveform or “function” you want in the oscillator. “Low Frequency Modulator”, Sampler’s LFOs serve a similar function to any other synthesizer. Next You will want to turn on the “Filter” setting in the filter tab.

Select the “Filter” button to turn it on and lower the frequency of the filter to a point where it will affect the audible part of your sample. Next, go back to the modulator section and pull up the Filter percentage of LFO 1 to a desirable amount. (I suggest turning it all the way up to 24).
This technique is excellent for adding rhythm and variation to your sub basses. If you’re creating hip hop, trap, or bass music this technique can add some excellent flair to the 808s in your beats.
2. Resampling With The “Slice” Feature
Another great creative use of Sampler exists within the synth’s “Slice” feature. If you are within Ableton 11 right click on “Sampler” and select “Sampler—> Simpler” from the drop down menu. This converts your audio file into Ableton’s other sampling VST called Simpler where you can host a myriad of other options for slicing and dicing your samples.

In this example I have imported a saxophone loop from a producer’s sample pack. Simpler has put warp points at this sample’s transients, separating the notes from one another, now I can play each note of the saxophone separately on my keyboard.

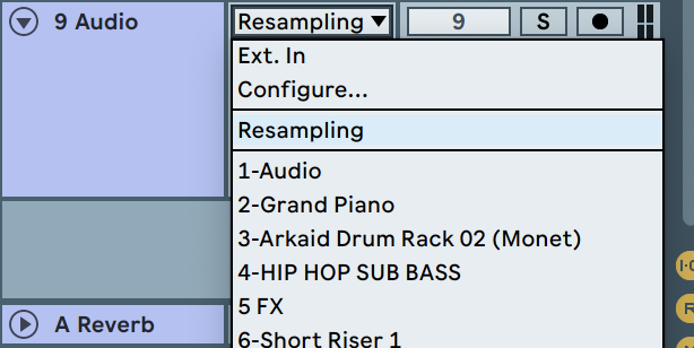
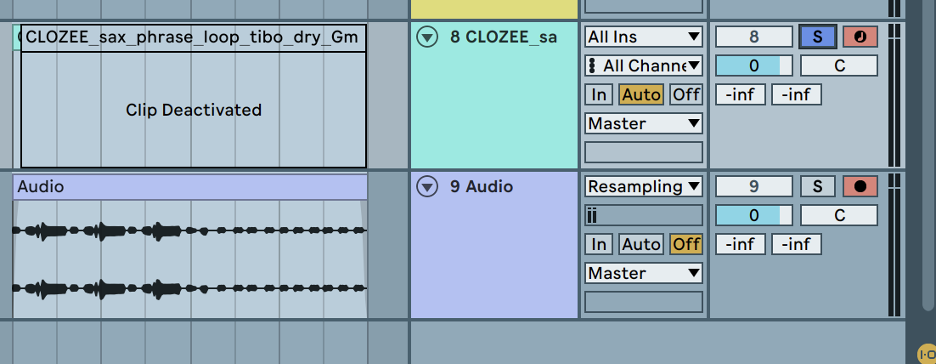
Next, create a new Audio track and choose ‘resampling’ from the drop-down menu to record your performance into a new audio track. Select ‘solo’ on your Simpler track, and arm the Audio track you just created. Now when you click record in your DAW, you’ll record your samples straight into a new audio track.

You can now record the midi into the audio track using your keyboard in any sequence you like, then you can re-import this audio back into your Sampler for unlimited combinations.
3. FM in Sampler to Create Wild Basses
FM, or frequency modulation, is one of the most utilized techniques in sound design. It is often used by many artists in the House genres and is notorious in the Night Bass Label’s signature sound. Sampler has a built-in oscillator function under the pitch tab that allows you to use this technique to modulate your audio samples in Sampler.
Find the Pitch/OSC tab and select OSC on the far left hand side. Then move to the right side of the VST and turn up the volume. I would also suggest turning on the Sync function and increasing the attack like in the example below

4. Create Gnarly Samples With “Loop Modulation"
Most have used a sampler to loop a sample before and make it repeat. However, there is also a little-known trick many experimental bass producers use. This modulation is done by randomizing where the loops begin and their total duration. By modulating these parameters, the Sampler can completely randomize what parts of the sample it is jumping to, and create insanely unique sounds.
There are a few key steps to this technique:
After importing your sample of choice, turn the sustain mode to looping. This is located in the middle of the VST towards the bottom. You will see two arrows facing each other.

Next, adjust the “Loop Start”, “Loop End” and “Crossfade” points in the sample view.
Then, move to the Modulation window and enable the “Aux” envelope as pictured below. Set the sends for the envelope to “Loop Start” and “Loop Length”. This will allow the envelope to adjust the looping of the sample per the ADSR parameters you set on the Aux envelope.

Finally, adjust the ADSR of the Aux envelope, as well as the Loop Start and Loop End points of the sampler.
5. Modulating LFO’s Wobble with LFO 2
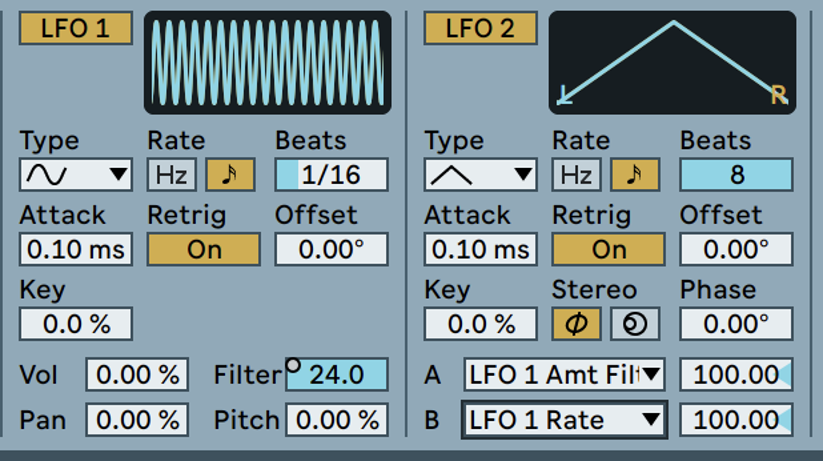
Another capability of Sampler that is less well known, is the ability for the LFO’s to modulate one another. In order to utilize this, simply enable LFO 2 (or LFO3) and set the A and B sends of LFO 2 to LFO 1 parameters. The best options for cool sounds are the filter amount and the LFO 1 rate. This will make it so your filter wobbles that were introduced in part 2 can be adjusted over time by LFO 2. Adjust these parameters along with the settings in LFO 1 and your Filter.

6. Bringing It All Together
The best way to make a sound unique is to combine all the techniques shown above and to edit the parameters on your own until you can achieve a sample sound that is truly one-of-a-kind. Import a sample, and set up LFO 1 to wobble the filter system and use LFO 2 to modulate its modulation. Next, add the FM track from the OSC envelope in part 3. Then experiment with adjusting the Loop Start and Loop End points from part 4 to taste. Change all these parameters as you see fit and combine them or resample them to create endlessly unique sounds out of whatever samples you have available.


_Cropped.png?width=1600&name=02%20(2)_Cropped.png)


Your Comments :