


EQing is a fundamental part of music production. It's the process that allows us to shape and carve out frequencies in a sound or multiple sounds within a session. However, not everyone will have the same technique. Each sound is a case-by-case basis when it comes down to EQing and the more overall knowledge you have, the better you'll be at mastering your EQ.
Types of EQ
Just like any other tool in a production arsenal, EQs come in all shapes and sizes. The most common types are Parametric, Graphic, Semi Parametric, and Dynamic Equalizers. Each one playing a different role when dealing with frequencies. It's important to know each type of EQ and experiment with what works in your sound.
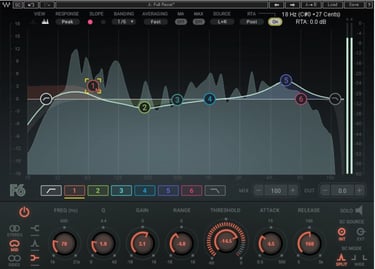
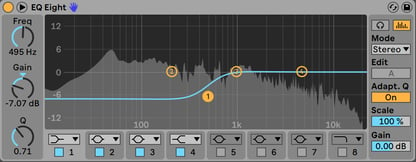
Parametric and Semi-Parametric EQs are equalizers that use frequency bands and a Q function to adjust frequencies at an almost limitless potential. They're the most common EQs used in music production today. A parametric eq has a standard 8 frequency bands that can function as a low-cut, hi-cut, low-pass, hi-pass, or bell curve. A semi-parametric eq is similar but lacking in certain functions. For example, semi-parametric EQs generally fixed frequency bands or high, mid, and low frequencies while a fully parametric EQ can be adjusted in multiple ways.

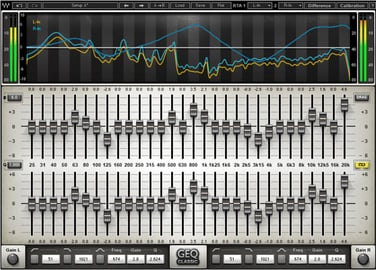
Graphic EQs are a simplified form of eq. They're mainly used for broad strokes, whereas parametric EQs can be used surgically. Having multiple frequency bands but less adjustment when it comes to the width of the band.
Dynamic EQs are equalizers that utilize a threshold feature when Eqing a sound. This acts similarly to a compressor meaning when a sound hits a threshold parameter, the eq will adapt slightly to tame and soften those frequencies. Unlike a compressor, this can be adjusted thoroughly through parametric frequency bands for a tight and tame sound.
Know Your Frequencies
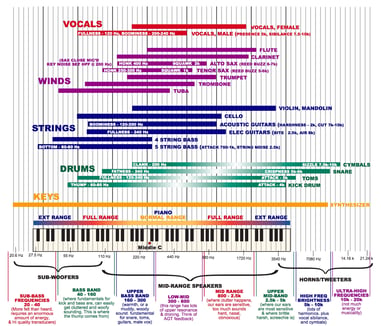
There is never a cut and dry way to eq every sound. However, there are frequency groups where most sounds reside. From Sub Bass to High Vocals, here are a few groups to chunk out that frequency spectrum and make it easier to understand where to focus when Eqing different sounds.
Sub Bass (20 – 60Hz)
This is what you'll mainly hear with headphones, a nice set of studio monitors, or a subwoofer. This is what you'll feel in your chest at a live performance. A lot of rumble can build up in this area, Even from noise.
Bass (60 – 200Hz)
This is where the bass guitar will sit. This can also be an area where male voices and their fundamental frequencies will sit at around 100-300Hz
Low-Mids (200 - 600Hz)
The Low-Mids is a very important place for mixing. This is where we can see a lot of build-up from guitars, synths, top-end bass, and even vocals.
Mids (600Hz – 3kHz)
The midsection of a mix is where our ears tend to focus. The majority of the vocals, some guitar, and a lot of body exist here. Having too much energy in your mid-range can make a mix sound boxy.
Upper Mids (3kHz – 8kHz)
This is where a lot of harsh frequencies will exist. Crashes, hi-hats, and the top ends of the snare drum. They can be carefully tamed but be sure not to over mix and lose a lot of that high-end energy.
Highs (8kHz & Beyond)
This is where the treble or airy frequencies exist. There can be plenty of harsh frequencies here but it's also important to let the song breathe, being sure the tame harsh frequencies while letting the natural sounds of the song exist.
Types Of EQ Bands & Their Functions
While graphic and semi-parametric EQs are perfect for shaving off portions of a sound, they aren't as useful for surgical Eqing such as taming harsh frequencies. Each band of a parametric EQ can be used in multiple shapes to manipulate a sound.
Low-pass
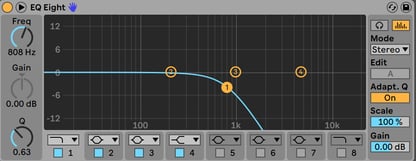
The low pass curve only lets frequencies below its cutoff point be heard. This could be used to isolate the lower layer of your sub-bass, cut high-end frequencies out of a sound, or even automated to give a cool muffled effect.
High Pass
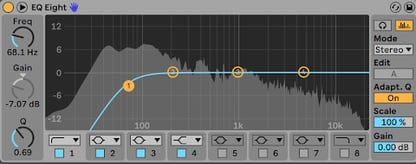
Similarly, a high-pass curve does the opposite, letting only frequencies above its cutoff point be heard. You can use this to roll the low end off of any sound, isolate the frequencies of high-pitched sounds to leave more room in the mid-range. Even reduce low-end rumble in your track. Be careful not to high-pass everything. This could cause your mix to feel shallow.
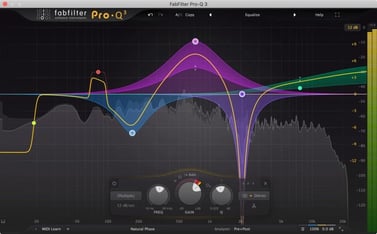
BELL
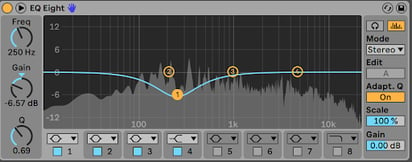
A bell curve can either boost or reduce frequencies at a certain point, adjusting the width of the bell with your Q setting. This can be useful for fishing out nasty frequencies or carving out space in one sound to make room for another in your mix.
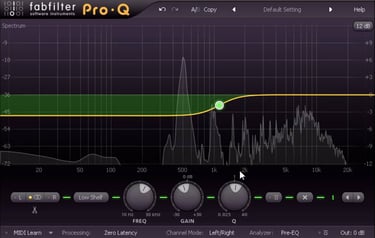
Shelf
An eq shelf is a useful tool to dampen frequencies but not eliminate them entirely. Acting as a middle ground for sounds. Using shelf bands can leave your mix sounding more natural and cause fewer phasing issues than cutting frequencies entirely.
EQing Strategy
Eqing a sound can not only make but break a mix. Eqing is an intentional process that requires balance. Having a solid strategy when Eqing a sound is the easiest way to avoid mistakes.
INTENTION
Many producers will tell you their own favorite way to EQ different sounds, but no two sounds are alike. The way you tackled a sound yesterday might not be the same as today. Each time you go to adjust the frequencies of a sound there should be a specific intention in mind. To cut the low end, tame the highs, or even carve space where it's needed. Never adjust a sound based on what you've heard from others, base it on what you hear in the song. Trust your ears, if something sounds off, try to find a way to fix it.
LESS IS MORE
Making big moves in music production can often lead to interesting outcomes. It's important to get a feel for your plugins and know where their limits are. Making those same adjustments with your EQs can help you learn their style and how they work, but it's necessary to be mindful of how much space is in your mix. For example, putting a similar high-pass filter on every element in your mix that isn't bass can leave your mix hollow and in need of mid-range. This can also be said about the opposite effect. Leaving too much low or mid-range energy can leave your mix sounding muddy. Whether you're being more surgical while editing sounds, or rolling off large amounts of low end, make sure to listen and make sure your mix is sounding full and natural. Small adjustments can make a huge difference.
EQ In ContexT
It's tempting to solo each track in your session and EQ out every bad frequency in the sound itself, but this can be a dangerous habit. Adjusting a sound too much outside of the mix can hurt its overall quality. It's important to listen to that particular track or sound in the context of your song while you EQ. This doesn't mean you can't solo the sound and make adjustments, just make sure to A/B that sound with the rest of the mix to make sure it blends well. If the entire mix is too loud to hear the sound you might EQ it in the context of a smaller group. For example, Eqing the snare drum while listening to all of the drums in your mix together. This will help you adjust the frequencies and volume of a sound to balance it in your mix.
EQing vocals
Eqing a vocal can be a difficult process. Since the human voice is so dynamic it can be tough to know where exactly to adjust. You're dealing with things like breath, nasal tones, and vocal fry as well. Following these steps won't work for every vocal, every single time, but they're a good starting point when Eqing a vocalist.
Roll Off the Lows
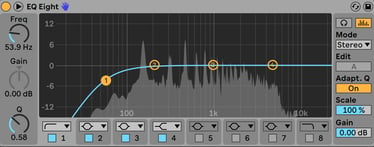
Using a high-pass band you're going to want to roll off anything below 60Hz. This includes noise from the room and even the mic itself.
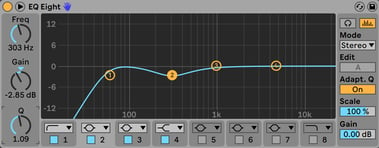
Muddiness in vocals can tend to accumulate between 200-500Hz. Creating a slight dip here with a bell curve can take care of any unwanted mud while leaving room for the sound to breathe.
Add Presence
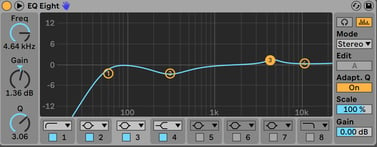
To make the vocal sound a bit more pronounced and firm, give it a little bell curve around the 4kHz-5kHz range to add some presence. Make sure not to make the band too wide otherwise it can be a little overdone.
Brighten The High-End
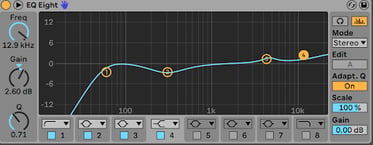
Adding a high shelf to the end of your vocal EQ to give the high end a little brightness and make it stand out more in the mix. Be careful not to add too much. The vocal could become harsh.
Understanding how to properly EQ a sound is essential for music producers. Practicing your technique and experimenting with different sounds is the best way to perfect your skills. Each EQ will function differently but the principles stay the same. Make sure to trust your ears and your gut!

_Cropped.png?width=1600&name=02%20(2)_Cropped.png)


Your Comments :