This is where we tie together all the things we went over in the previous articles.
You’ve got the passion, you’ve made the decision, you developed an idea, you recorded it and now are ready to see how music production works.
The definition of a music producer has changed over the years. Once it was a person who sat behind a recording engineer at the console and oversaw the recording of artists and groups. Having a musical background and a good ear the producer would offer changes and ideas that supported the commercial appeal aspect of a record label and how to get the most out of the musicians in order to obtain the top 10 ranking and high album sales.
A producer of anything is defined as a creator, builder, manufacturer of a product. Tangible or nontangible.
Today music production can be done at home by what is called a “bedroom producer.” This individual may be a one-man band, a member of a full band, a solo artist, or a beat maker.
A beat maker produces beat loops and is still a beat maker. However, they too have a process and the end result is that they produce music. While the process is different for an artist and beat maker, there are some similarities and I will cover the most important aspects of both.
THE STEPS IN MUSIC PRODUCTION.

As with any process, there is a flow to it that helps make everything fall into place.
Similar to walking up stairs, you can’t get the next one without the one prior.
Recording Artist
- An Idea / Song Writing
- Rough Mix / Demo
- Practise
- Basic Track
- Mixing
- Rendering The Final Version
Beat Maker / Electronic Musician
- An Idea / Creating the Sound
- Sound Design
- Mixing
- Rendering
Since these differences do exist I will cover the Recording Artists steps first, followed by the electronic musician steps, and then bring us all together for editing, mixing, and rendering.
FOR THE RECORDING ARTIST
STEP 1: THE IDEA
First things first. Writing the song. This could mean lyrically or melodically.
Having a basic outline and song structure.
Lyrics
Unless you are composing an instrumental or creating samples, lyrics are the most important part of the song. Song lyrics are best when written from experience.
This makes it appeal to others as they see it as something they can relate to. Some of the most popular and powerful songs were written about a personal experience.
Hit a rut?
The best thing to do when you suffer a case of writers block or get stumped is to collaborate with other musicians. The outside looking in perspective could have some insight. Even just the conversation could yield advise that could inspire you and get you back on track. Also helpful is to use a thesaurus and don’t forget to take a break. A change of scenery is proven to stimulate the brain. This applies to both aspects of music production. The recording artist and the beat maker.
Structure
The typical song structure is Intro, Verse, Chorus, Verse, Chorus, Bridge, Verse, Chorus. There are also pre-chorus, fills, transitions, and outros.
Intros tend to tell the direction of the song within the first 30 seconds. Your intro needs to grab attention while the rest of the song will keep them listening. Some statistics from music listeners:
- 24.14% skip within the first 5 seconds
- 28.97% skip within the first 10 seconds
- 35.05% skip within the first 30 secondsA
The verse is where the story is. Descriptive words play a big part in setting the scene. When writing a verse it should answer questions such as:
- Where is it taking place?
- Is it day or night?
- What is the mood?
- What objects are involved?
- Who is involved?
The story should literally paint a mental picture that someone can imagine.
Most listeners engage in virtual participation. They like a song because they feel as if it was written about/for them. When they sing along they get the feeling as if they are actually the one singing it. The more a person relates to it, the more they listen to it, and the more connected to the music they feel.
Music
At this point, the music should also be structured. The main melody line and chorus line should be created and ready to go. Things like transitions, intro’s, solo instrument parts don’t need to be concrete, you just need to have the foundation of your vision written and ready to be built upon.
STEP 2: DEMO
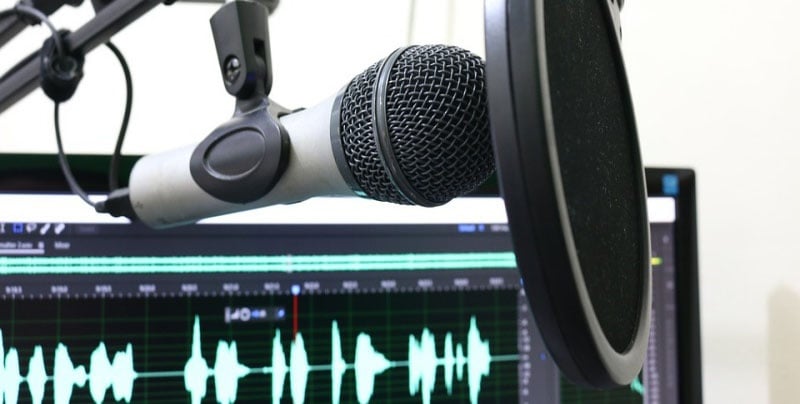
Record a rough mix. A demo is not perfect and typically no mixing has been done.
The idea behind a demo is to get the basic idea on tape. To capture a demonstration of skill, ability, and musical direction. This is by no means a final version and should be gone into with the mindset of things being altered. In comparison, it is the primed and painted version, not the polished final presentation.
When creating a demo it is a good idea to listen to it frequently. This will allow your imagination to take things in different directions, make changes, add things, take things out, and so on.
The recording can be done with a simple microphone and recorded onto a digital recorder, laptop, or PC. Depending on the quality of your smartphone, this can also be a way to capture your demo track.
STEP 3: PRACTICE
Practice Practice Practice.
Then,
PRACTICE MORE!
You want to be sure you know the ins and outs of your idea like the back of your hand. This will ensure you that when it comes time to record the basic tracks, you’ll nail it. Re-takes can be very time consuming and frustrating when your rough mistakes haven’t been corrected by enough time spent practicing.
STEP 4. BASIC TRACK
This is the time to put your best foot forward and be critical. This is the track that is going to be formed into it’s final and most perfected version.
If you are recording into a multitrack recorder or using a multi-channel mixer the first thing to do during set up is to label everything and make notes. If you have to stop it is a lot easier to return to the same point if you know where you were.
Everyone says, “I can remember, no big deal.” We’ve all done it. And we all had to take a couple of steps back because we didn’t remember.
Using tape to mark each mixer channel is always helpful. As is having a notebook on hand and once sound level s have been established writing down the microphone type, it’s direction, the instrument it is on, and the input level. This will save you a lot of time should a microphone get bumped or a knob gets turned.
Your volume should be set at unity gain and never moved.
Unity gain is when the input level matches the output level.
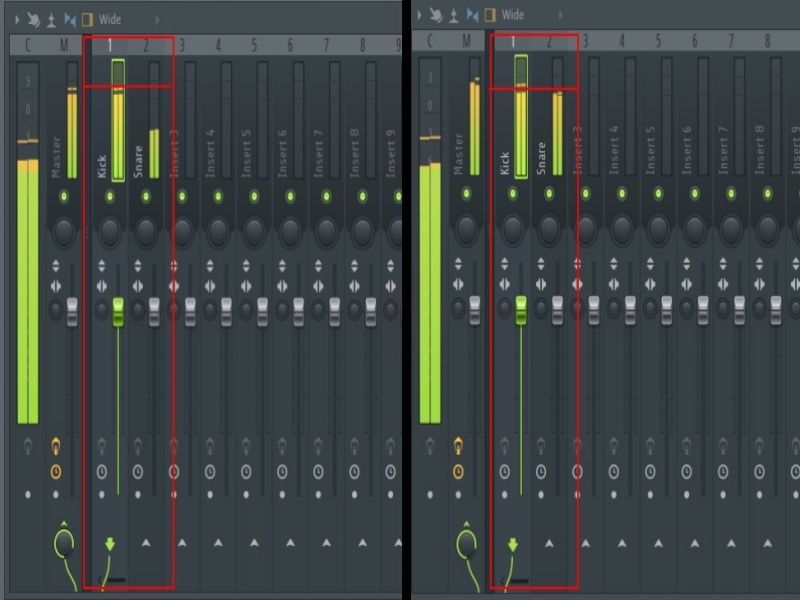
The image on the left shows that my snare is at a lower volume than my kick. All I have done was increased the output volume of my snare and as you can see in the image on the right, they are now at the same level. Unity Gain.
Now that you have established a balance, hit record.
BEAT CREATION / ELECTRONIC MUSICIANS
Without a live band, you don’t need to sit and strum a guitar for hours or sit in a room surrounded by your band mates waiting for that 1 moment where you are all on the same page and one part gets played over and over and over again. You don’t have to record scratch tracks, and let's face it practicing electronically is totally different than practicing a live instrument. Here is how music production works for the electronic musician and beat maker.
First things first, if you have not done this already, spend 1 day of your life with your DAW. Not with the intent of making a song or a beat. Becoming acquainted with it. That's right, date your DAW for a day. Learn the shortcuts and sweet spots.
GET ORGANIZED
Most DAWs will allow you to rearrange your plugins. Quality over quantity guys. How many of the same EQ, compressors, and verbs do you really need? Pick your favorites and make them readily available. This will create a better, faster, easier workflow.
Color coding.
Stock color is boring. By seeing variations in color it helps your eyes tell your brain how to differentiate between what is what. This can be applied to groups, tracks, sounds, and your mixer.
Name your tracks and files.
This may sound stupid but it is a lot easier to locate a sound quickly when you know what to look for. This can also be fun. For example:
- MorningFartA
- AftermealbelchC
- NaggingSpouseD#
- LightPianoArpB#120
- GrooowlD100
- CatinheatC110
Not only do I know what the sound is, I know the key and it’s BPM. This will eliminate time wasted scrolling, playing, and searching for the sound you know is there easily and quickly.
SOUND DESIGN
Be original.
Basic recorders and a simple mic setup can lead to creating original and unique sounds. To demonstrate this I recorded myself flicking a half full/half empty can of soda on my phone.
Original Sound
I added some delay and saved the file.
I added a flanger and increased how many times the sound is played and I saved the file.
I added distortion and saved the file.
I now have increased my library with a couple sounds all generated from one sound.
To demonstrate an even better scenario, I created a short 28-second track using all of the variations of the original sample. The only sound not generated by the can is the kick drum.
Presets
Presets are created by professional sound designers. Considering that they know the ins and outs of the plugin and have more experience with it, it’s safe to say they know their stuff. Why not learn from them? Manipulate the preset, play around and experiment with them. Make them fit your track. End up with a cool sound? Awesome. Go apply some texture by altering the pitch, distorting it, or playing it in reverse. It’s not cheating to originate from a preset. It’s being resourceful by learning from a tool provided to you. It becomes creative when you alter it and make it your own.
Keep it Separate
Separate your sound design sessions from your composition sessions. Designate time for each. You’ll find you get more done when you are under a time restriction.
RECORDING ARTISTS, BEAT MAKERS& ELECTRONIC MUSICIANS
STEP 5: EDITING/MIXING
Editing music can be defined as any process that alters the original performance. This is where effects are applied, any samples are inserted, any changes to time, pitch, perfecting levels, panning, and most importantly polishing the mix to perfection.
Rather than spend way too much money trying to soundproof your room, just listen to your music outside the studio. Listen in a car, listen in headphones, do an upload test to SoundCloud or YouTube and listen to it on your phone, render it to CD and play it on your home theater or T.V. The more you listen to it on as many options as you can you are more likely going to notice little imperfections and adjustments that need to be made.
Adding Effects
Too much reverb can kill your mix. Reverb should be just loud enough to hear, but not overwhelming. Same with delay. It shouldn’t be easy to point out. In fact, it should be applied to the point where it's barely noticeable.
Get a bass reference track. Take your mix and apply a low pass filter then compare your track to the reference track. This can seriously help you achieve a great low end.
EQ. Don’t be intimidated. Again, get a reference track that is similar to the style you have. Don’t be afraid to test the waters until you get the same kind of equalization. Trust your ears.
Most instruments have no business being at low muddy frequencies. Cut the low end on those instruments. This can be done by using a high pass filter.
This will also free up frequency space and allow your bass to breathe.
Don’t get too crispy. It’s audio and not a bowl of Rice Crispies.
EQ should always come before compression. Remove the unwanted sounds first. Want to test your skills? Drop the mix into Mono. Remember not everything plays in stereo. So some of your panning tricks may reveal a terrible secret.
Compression. This one is tricky. The job of a compressor is to make the softer parts louder and the louder parts softer, thus creating a middle ground. This is a great tool for vocalists. If only more T.V.’s had compressors, nothing worse than a loud/soft movie.
Same goes for music. Similar to going on a date with your DAW for a day. The same should go for you and your compressor. Play with it, study it, and learn it.
Failure is not an option, and perfection is the goal.
Mixdown is the most crucial part of the process. Make sure your levels are accurate, everything is in balance, and polish it. Don’t over think it. Just polish it.
THE FINAL STEP: MASTERING AND RENDERING
Now that you are recorded, mixed and ready for mastering, here is something to consider.
Audio Format.
This depends on the intended use of your final product. Whomever will be mastering your track will need to know the format you want your tracks rendered to. Below is a list of required formats by platform/application.
- iTunes (standard), Spotify, and other online stores — 16-bit/44.1k WAV files
- Mastered For iTunes — 24-bit/96k, 88.2k, 48k, or 44.1k sample rate WAV files
- Bandcamp and SoundCloud — 24-bit WAV files (sample rates above 44.1k)
- Compact Disc —44100 Hz 16-bit stereo WAV or AIFF file.
- Vinyl — 24-bit WAV files (sample rates higher than 44.1k if available)
- Cassette — 16-bit WAV files (sample rates higher than 44.1k in some cases)
- Music Licensing — 48k WAV files (with 320kbps reference mp3)
Why not an MP3?
This begins an educational moment on lossy and lossless audio.
Lossless formats use compression algorithms that preserve audio data so the audio is exactly the same as the original source. The most popular and universal lossless formats are WAV and FLAC. While the quality is there they are generally larger in size.
Lossy formats have a greater reduction in file size by removing some of the audio information and simplifying the data. This of course results in a reduction in audio quality. The MP3 format being the universal example.
Most formats offer a range of degrees of compression, measured as a bit rate. The lower the rate, the smaller the file and the more significant loss of quality.
- Remember bit depth and bit rate are not the same things.
- Bit depth is the number of bits of information in each sample.
- Bit rate refers to the number of bits transmitted or received per second.
The standard audio CD is 44.1kHz/16. Meaning that the audio data was sampled 44,100 times per second and with a bit depth of 16. Which is what you want to render your samples at. 44.1kHz with a bit depth of 16 in WAV format.
- kHz = kilohertz
- 44.1 = audio data sampled 44.100 times per second
- 16 = bit depth
Educational moment over.
I know we covered a lot. The beauty of the internet, you can bookmark it and come back for a refresher anytime.
FROM THOSE WHO KNOW, ASK A PRO.

Now you know the process and how producing music works. As always to close out this article is my section, “Take it from those who know and ask a pro.” This is where I have reached out to my network of musicians, audio engineers, bedroom producers, and professional music producers and asked them to answer the question “How does music production work?” Here is what they had to say.
“It allows you to put vocals and sounds together to arrange a musical master piece.”
“It just all depends on what your working with. When I first started I only had a RadioShack keyboard and to radio casted player/recorders.”
“Music production works by helping artists achieve their artistic vision and end goal.”
“Music production is the same as composition. One composes the individual elements of a song (rhythm section, bassline, melody, chord structure), chooses and manipulated samples and programs synthesizers. The computer then acts like a band or an orchestra performing the piece.”
“In this context, music production can include everything designing sounds, writing melodies, chord progressions, drum loops, bass lines, arranging everything into a song, mixing each element to fit them together and applying FX.”
“It depends on the type of music you are producing as to how the production side of things works. Music production is a multistage process that can involve a number of experts with different skill sets who all work towards making a great product.”
“A really rough overview would be that the producer organizes and oversees production of records from recording to editing, then to mixing and finally, mastering. After this, record distribution is handled by the record label. “
“The producer might also choose to have creative input to help move the band or artist in a direction that works better - which could start with song writing, both before and during recording.”
“Writing, Recording, Editing, Mixing, and Mastering.”
“There are many facets under the blanket term of music production, each with its own strategy for success. Some folks want to write music, others record it, or mix it, some are focused on mastering. Many of us choose to be the proverbial jack of all trades and take each step of the process on. Whichever route you decide to take thesingle most important principal is a dedication to quality from start to finish. A successful release requires well written material, that was well recorded, well mixed and well mastered.”
“For me, it’s the process of “realizing” the sounds I hear in a repeatable form. I typically start with some low quality synths and drums, and compose the track. I’ll arrange the musical ideas and add accompaniment across different instruments. Then, refine the sound design and record live instruments. Mix the “nearly final” tracks, adjust the master track, and it’s a song.”
The music production process is very intense, with good practice you will develop experience and perfect your craft. Check back for the next chapter, “What music production software is best?”
If you have any awesome advice to add please feel free to leave it in the comments section below. See ya next time.



_Cropped.png?width=1600&name=02%20(2)_Cropped.png)


Your Comments :