


The last NI Massive sub bass patch you will ever need. The key to a fat sub.
Has anyone ever told you that your track lacks weight or isn't 'heavy' enough? These are classic problems that go hand and hand with the low-end and its theory. One of the best ways to start working on this is by making sure that your sub bass is up to standards. This blog post is inspired by the sub bass questions within our facebook group community Knowledgeable Producers Q&A.
A key to having a great audible sub bass is to make sure that it has a nice solid and clean fundamental as well as the 'right' amount of harmonic content. The fundamental frequency is the base foundation note that represents the pitch that is played and the harmonics are the following frequencies that support the fundamental. It's the extra higher frequency harmonics that allow for the sub to cut through the mix and be heard better on monitoring systems that aren't able to output frequencies that low such as phone or laptop speakers.
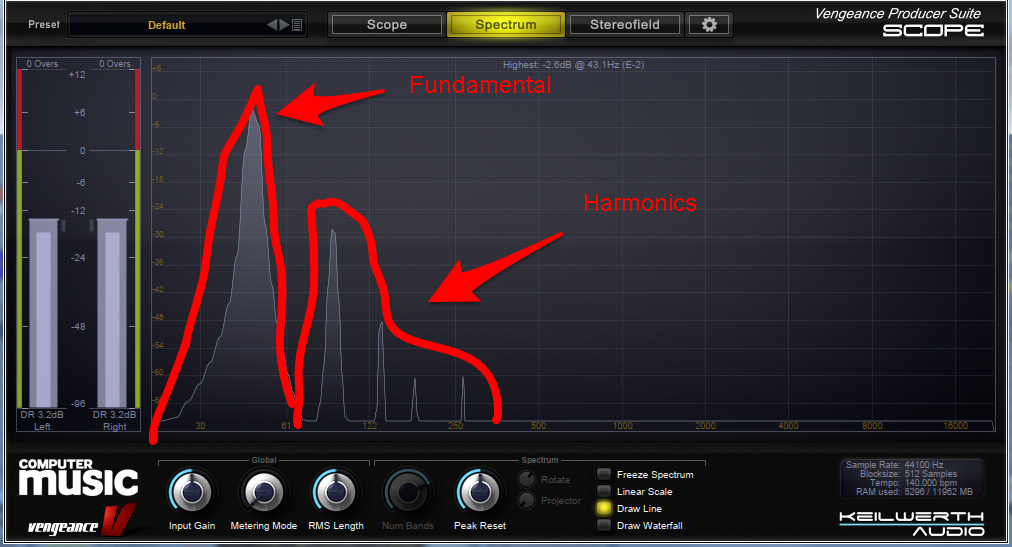
Now I say 'right' amount of harmonics because there is no right or wrong in music of course but after studying and analyzing other sub basses I've found that you don't want to go crazy on harmonics as it will take away a lot of the perceived bass and power of the fundamental sine wave (unless you are going for that kind of sound).
Starting off with a Sine waveform
The most basic waveform of all the sine.

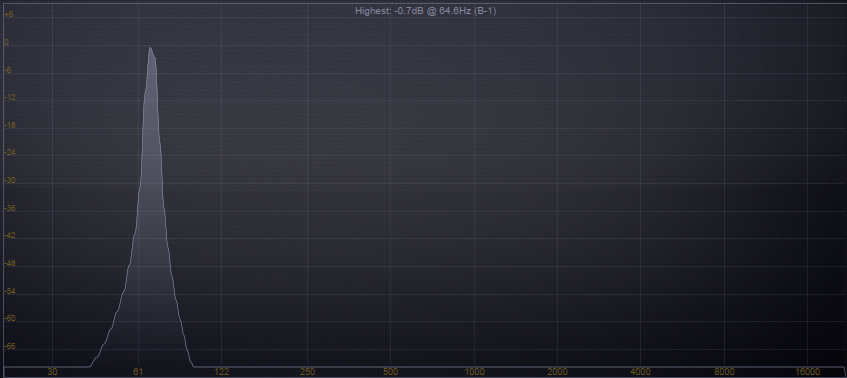
While the sine is basic don't let that fool you, a pure sine can pack a lot of low-end beef by itself that will knock your socks off. Here we start off with a sine down one octave (this patch is meant to be played from C1 and above for best results). We have our sine routed to filter 1 which we will cover in more detail inside the filter section as well as cover the macro in the macro section.
Here is what a sine from Massive looks like in spectrum view played at C1 by itself.
Adding subtle upper harmonics with the smooth square waveform
Weak speakers? No problem we can help.
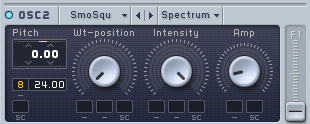
For our 2nd oscillator the smooth square wave is selected with the Wt-position turned all the way to the left to reduce the amount of harmonics from the wavetable. This isn't always the case with wavetables in Massive but is more specific to the smooth square wavetable. We have left the pitch at a neutral 0 which makes it an octave above the sine wave we have already included in our patch. This is something that I will often do in order to reach those upper harmonics easier.
If you play the current sound you may notice that the smooth square doesn't sound so in place right? That's where we use more of our blending and mixing skills to get it 'inside' the sine. Turning the amplitude down while listening you can hear the smooth square starts to play a lot nicer with the sine. This is something you can adjust to your own personal taste.
Last but not least we have routed our smooth square to filter 2 which we will cover in more detail in the filter section as well as cover the macro in the macro section .
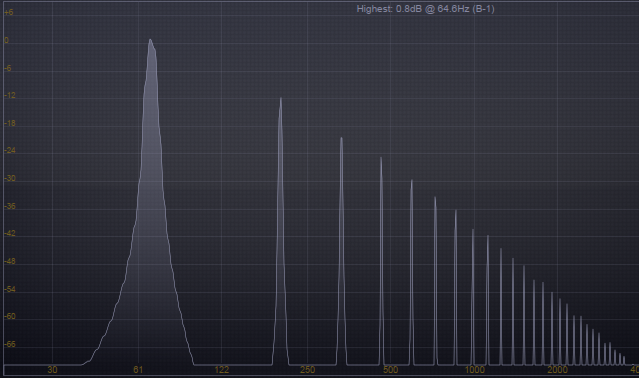
Here is what a smooth square from Massive looks like in spectrum view played at C1 by itself.
And the same smooth square in a freeze frame of an oscilloscope.
They didn't call it smooth square without a good reason. You can see it has the characteristics of a... you guessed it. Smooth square. We are personally using this as our choice to add in subtle harmonics as I find it provides just the right amount of subtle smoothness that I enjoy in a sub bass.
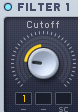
Filter Section
That's it for the tone generation part of the sound. Now it's time to sculpt it into our desired outcome.
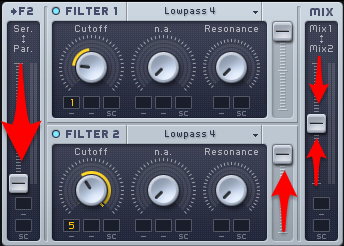
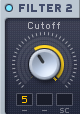
This is the most important part of this sound as it determines how you control these raw harmonics. Go ahead and select lowpass4 filters for both filter 1 and 2.
The first filter controls exactly how much of the pure sine that we want to allow to come through while the second filter controls how much of the high end of the smooth square that we allow to pass through.
In order for this sort of true parallel filter routing to work we must first make sure that:
- Our routing faders for Osc 1 and Osc 2 are routed to filter 1 and filter 2 respectively.
- The input fader for the filter buss routing is in the bottom position indicating that it is operating in parallel routing mode.
- Filter 2's output fader must be brought up so that the filter can be heard.
- The total filter section mix fader is in the middle position between both mix 1 and mix 2.
Once you have the correct filter routing system setup you can then use the cutoff point of each filter to determine exactly how much of the higher frequency content you would like to allow for the sine through filter 1 and the smooth square through filter 2 respectively. This is completely up to personal taste and desired results. The above settings are just a suggestion and great starting point. You'll be able to tweak the patch quickly to find the exact amount of harmonic content you would like in the sound once we get to the macro section.
FREE DOWNLOAD OF THIS PATCH HOSTED HERE!
Inserts
After the filter section we move onto the inserts. Here is where we will be apply the most amount of harmonic excitement with some nice distortion types.
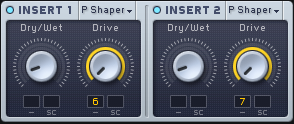
We are using the parabolic shaper distortion type for both inserts as they provide some of my most desired results. This is completely up to personal taste as well though I do recommend using the parabolic shaper type at least inside of insert 1. This is a pretty straight forward use of the inserts. Both have a very low fixed dry/wet amount for subtle use of the effect (are we ever going to stop using the word 'subtle' in this post? Probably not and expect more in the future) with the drive of both inserts assigned to a separate macro for more surgical control which we will cover in detail in the macro section.
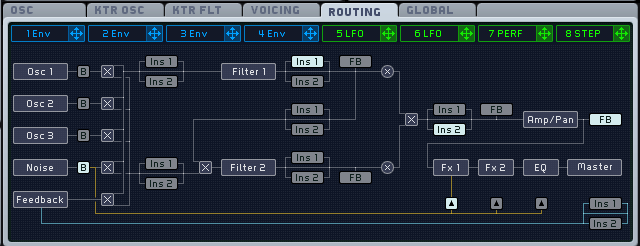
For the routing and placement of these inserts we have insert 1 directly after the first filter which is handling the pure sine and insert 2 is after the output of both filter 1 and filter 2.
FX
The icing on the cake. I only ever touch these after I've gotten the best possible sound from the earlier stages of the signal flow inside the synth. This ensures that I push the synth to its limit before relying on effects to make or break my sound.
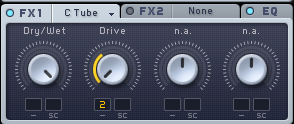
By this point in crafting this synth patch I'm already pretty satisfied. You can see here we are using a classic tube inside of the FX1 slot with the dry/wet completely up to 100% wet (what happened to subtle?). Tube distortion dates far back and that'll be a topic for another blog post (in which subtle may be thrown out the window because who doesn't love tubes?). If we refer to the Massive manual we find that the classic tube distortion option "simulates the effect of running your output through a tube amplifier, to help you create a more 'warmer' or 'dirtier' sound." That warm and dirty addition is exactly what we are looking for in our sub bass to give it the edge in those upper harmonics that matter. We have the drive set all the way down with a macro controlling its range which we will cover more in the macro section.
FX2 is blank as there was no need for additional effects but feel free to tweak the patch and come up with your own uses! It's okay to download and use this preset. Save yourself the time, you already have the knowledge now ;)
EQ
The last stage of sound molding.
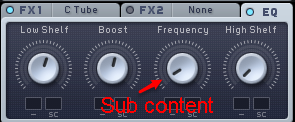
I want to start off by saying I don't think this section gets enough love. This final EQ can be the difference between a bright sound, a bass-filled sound, or just a plain old muddy sound. Here we boost the low shelf to taste (it really adds some nice thickness via this knob), boost more low frequency content just a little bit, and completely take off all of the high shelf.
Extra Tip: If you are using a lot Massive patches in your production and use the EQ around your favorite settings a lot (guilty of usually always boosting the high-end in the same spots), use the boost and frequency knobs to designate different areas of the spectrum for different sounds. It works a lot better than you would think for 4 little knobs inside a synth.
Wrapping it all up
Amp envelope
By default Massive has envelope 4 linked to the total amplitude of the overall sound.
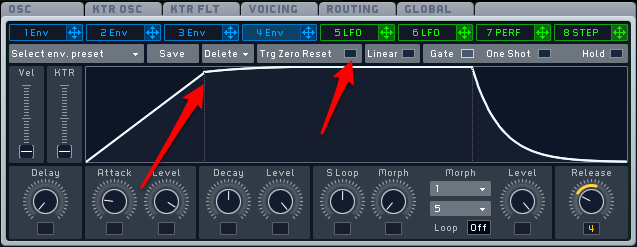
The only thing I've done here is increase the attack time a little bit to allow for a smoother fade in of the sub once it's triggered instead of it being so abrupt (ever get those nasty clicks at the start of your sub?). Addition to that I have slightly lowered the attack envelope to further continue with the theme of smoothness. Make sure Trigger Zero Reset is off so that there isn't any clicking between notes.
Important note: Release Time
We've made use of a macro control to adjust the release time on the fly. Morphing and modulating a synth's amp ADSR throughout a song can be an EXTREMELY powerful and dynamic tool at your disposal. By default with our release macro knob turned down the sub bass will play in short staccato bursts. With a the flick of the wrist (much pun intended) this macro knob will turn those short sub bass bursts into a more classic 808 style playable synth with a nice smooth decay on the overall sound. Not only is it playable on something such as a drum pad, it allows for a really fun one shot. Who knows, while you're playing around with the bass one shot you may come up with that smashing bassline for your next banger you've been searching for.
Osc tab
Let's make our patch more playable.
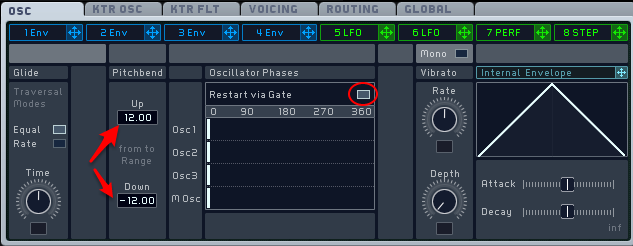
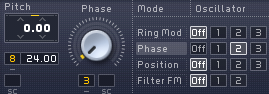
Here we select restart via gate which tells massive that each time a note is triggered that we will be starting that sound at the same exact phase point. This is desirable for sub bass as consistency is something that make a great sub. We also adjust the pitch bend range to up and down 12 semitones also known as a full octave. You can tweak the glide time to taste but the default 12 o'clock position works just fine for general use.
Voicing tab
All together now... Or not..
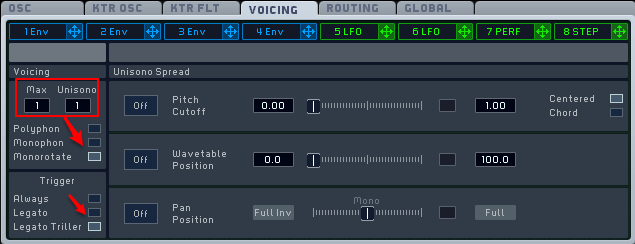
For the voicing of the patch we are only going to need a single voice so we will set both the max to a value of 1 along with the unisono as well with a value of 1. Monorotate is chosen to ensure that when playing one note and then another while holding the same note, that the previous note is faded out not to apply any clicks in our sub. Very small but useful detail. Legato Triller is selected as the mod of trigger to allow for fun and creative trills between 2 notes when one interrupts the other creating a sliding pitch effect. This can be heard is all sorts of genres and is frequently used in more urban productions.
Extras
These aren't needed for the core sound but offer that tiny bit of detail that will make your sub stand out above the rest.
Subtle phase
"The Phase modulation implemented in MASSIVE is sonically equivalent to the familiar frequency modulation or FM synthesis technique."
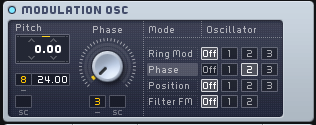
As quoted straight from the Massive manual itself the phase modulation in Massive doesn't necessarily have to do with phasing which you may associate with mostly negative effects. Instead it more or less works on emulating FM synthesis of modulating one source (the oscillators/the carrier) with another source (the modulation oscillator/modulator). I've decided to use this just to add a subtle bit of character to the patch.
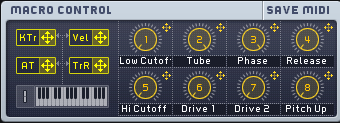
Macro Control Section
Getting hands on.
We finally made it to the macro section. Massive allows for 8 macro controls so why not set them up for optimal use? When I design synth patches I make sure to ALWAYS macro each and every slot available and you will find that true with EVERY Knowledgeable Audio soundbank release. I personally cannot stand when you download a soundbank and you find the macro controls either empty, uncompleted, or just plain useless.
What people don't realize is that macro customization is single-handedly one of the best kept secrets of improving workflow and keeping your sounds fresh. Do you want to know the best way to make your sounds stand out and more interesting without any additional synth work? Evolve them over time. This includes things such as:
- Opening cutoff filters.
- Changing the ADSR of your sound while it's playing.
- And even writing automation inside your DAW to add more harmonic grit via distortion in rhythms or during certain sections.
Let's go over our macros in this patch.
Low Cutoff
Controls the amount of upper harmonics that we allow in from the pure sine. Very powerful knob.
Hi Cutoff
Controls the amount of upper harmonics allowed from the smooth square. Most effective with higher amount of distortion added to the sound.
Tube

Controls the drive amount for the classic tube FX. Highly powerful for thickening up the sound.
Drive 1 and Drive 2
Controls the amount of drive applied from the parabolic shapers. Highly powerful and can be used together to get more surgical harmonics into your sub bass.

Phase
Used for subtle (last time this post I promise.. maybe) FM-like beef on our smooth square in osc 2.
Release

Used to turn this steady sub monster into a beefy 808 styled decaying sound that can be played as a one shot. Highly fun.
Pitch Up

Added simply because a lot of times you may not have access to your mod wheel or maybe because you don't like using the MIDI pitching inside your DAW (I'm glaring at you Ableton). This is a pitch up efffect spanning across 24 semitones or 2 octaves. This is perfect for buildups as you can start by blasting the sub and rising it into pretty much nothing audible (with this patch without heavy amount of distortion applied. Try it out). It's pretty much a 1 knob instant build. It is applied to all 3 oscillators in use in this patch.
Bonus Sub Bass Knowledge
Sidechain
Sidechain your sub to keep your low-end beef relationship between your kick and bass.
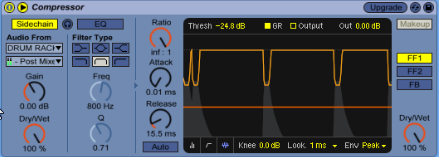
Besides the obvious pumping effect, sidechaining can be used subtly in a mixing sense (and SHOULD BE). Here you see I have the older Ableton Live 8 stock compressor loaded up. The reason for this is because the FF1 mode inside this compressor is insanely fast when it comes to reacting to audio. This is perfect for quick and accurate sidechaining but any compressor that allows for external sidechain input (or volume automation tool such as LFOtool/VolumeShaper/Kickstart) will work just fine. Find what works for you personally the best and run with it.
Sub Bass sidechain basics that you can apply right now:
- Fast attack time! As soon as the input source comes though the signal (the kick drum) you want it to immediately reduce the volume of the sub bass just a tiny bit. This will allow the kick to have that space and allow it to cut through the mix more followed up directly with that heavy sub in a matter of milliseconds (that's really fast).
- Fast release (BUT NOT TOO FAST). Notice how I don't have the release time set to as fast/quick as possible. This is to AVOID SUB BASS CLICKS WHEN SIDECHAINING. I know we've all been there when trying to sidechain sub bass and it's a tough one. The solution to this is to simply back off on the release time of the compressor. Think about it... We are instantly starting the compressor at each kick. If we were to instantly release that same signal it would be a bit of a mess wouldn't it? The result would be almost TOO short and choppy and nobody wants that. 'Dial in' your release time by starting with the release as short and fast as possible then slowly backing off the release time while listening to the changes it makes in the sound. Once you find that sweet spot you can rest comfortably knowing you have a perfectly tailored release time for your sound.
- Use the threshold, ratio, and dry/wet amount to control the exact amount of the sidechaining effect so that it isn't pumping too much or too little.
If this tutorial has helped you at all do us a favor by:
- Sharing it on your favorite social media outlet
- Commenting below about some sub techniques that you use so everyone can become more educated
- Simply liking our page on facebook (it benefits you as well if you enjoy our content!)
If you know a producer who really needs a better fat bottom sub share this with them so the world can become a heavier place! Happy composing!
Fish Jackson of Knowledgeable Audio
Brought by W. A. Production
_Cropped.png?width=1600&name=02%20(2)_Cropped.png)


Your Comments :