The last article we dedicated to Ableton. Now its time for FL Studio from Image-Line. In this article, we will take a brief look at FL Studio and I will show you how to get started producing music. FL Studio is a D.A.W. (Digital Audio Workstation). Most D.A.W.s offer the ability record live instruments, add effects, edit, mix and finalize your mix. What sets them apart is the custom features, ease of use, and compatibility. Finding the one that is right for you depends on what you want to achieve.
Why FL Studio and what can it do to help me produce music?
FL Studio caters to just about everything. While Ableton caters to a live environment and on the fly adjustments during a set, FL Studios strong point is electronic music composition. It does also allow you to record acoustic live instruments with ease. FL Studio has one of the easiest and user-friendly interfaces that make diving right in and creating a breeze.
Offering a library of sounds, instrument plugins, effects, editing, and mixing capabilities, you can use FL Studio from start to finish.. You can use a MIDI device, import plugins and samples in almost any format. You can customize any sound and make it your own. The latest version offers time signature changes that can be done at any point during your track and also has a solution for the dreaded issue of latency. FL Studio is available for Windows, MAC, and Mobile.
GET FL STUDIO
To test the functions and features of FL Studio they do offer an unlimited free trial. Thats right. The trial doesnt expire after 30 days. As with most trail versions some of the full version functions are restricted.
The latest version available is FL Studio 20, marking their 20 year anniversary. With purchase, you will also get lifetime free updates.
FL Studio offers 4 tiers you can choose from.
- Fruity Edition for $99
- Producer edition for $199
- Signature Edition for $299
- All Plugins Bundle for $899
All versions come with an easy to use installer. To choose your platform and check out the trial you can visit this link.
To decide which version is right for you visit this link.
If you need help they also offer a video tutorial that will walk you through installation and registration that you can view by visiting this link.
SET UP FL STUDIO
While FL Studio is almost foolproof when setting up, the only issue you may experience is the need for ASIO.
Audio Stream Input/Output (ASIO) is a computer sound card driver protocol for digital audio specified by Steinberg, providing a low-latency and high fidelity interface between a software application and a computer's sound card. Whereas Microsoft's DirectSound is commonly used as an intermediary signal path for non-professional users, ASIO allows musicians and sound engineers to access external hardware directly.
You can download this driver for free from this location.
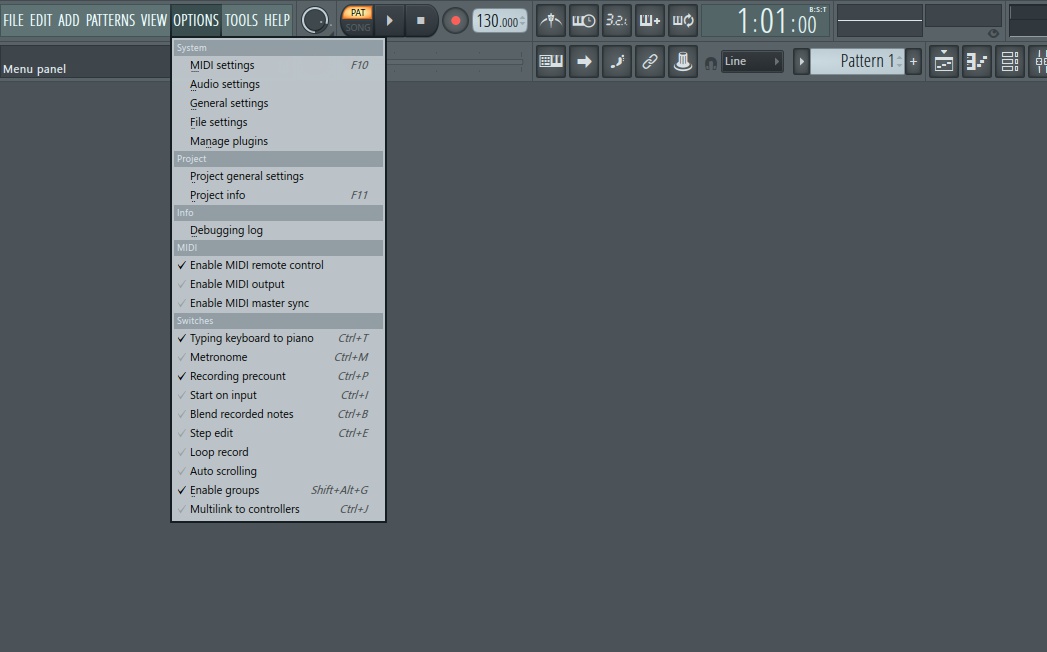
To access the audio, MIDI, and additional settings you can select OPTIONS from the upper left-hand corner menu.
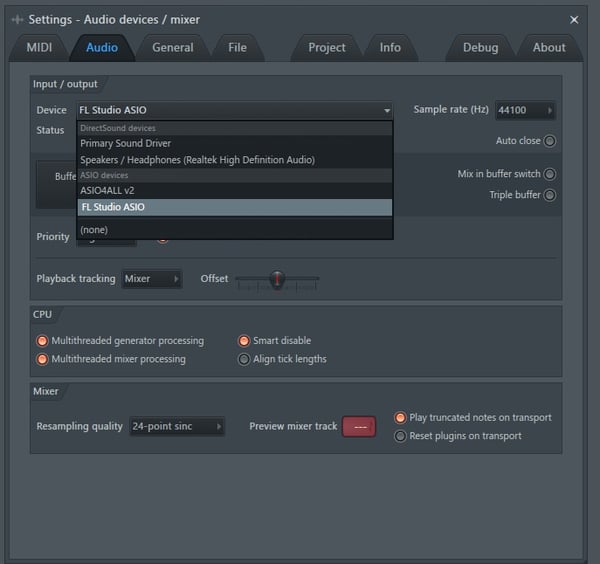
Select “Audio.” The drop down menu for Device should display your sound card or ASIO.
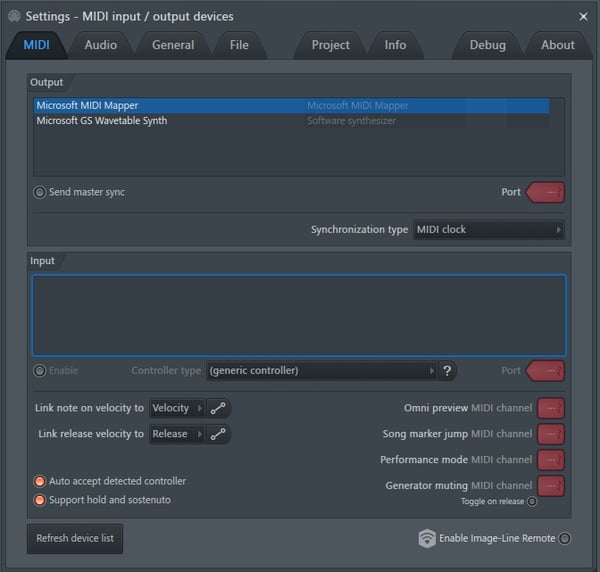
Select the “MIDI” tab and under input you should see the MIDI input device if you are using one.
INTERFACE
Once FL Studio opens up this is the starting interface screen. I will briefly cover some of the functions you will be utilizing the most.
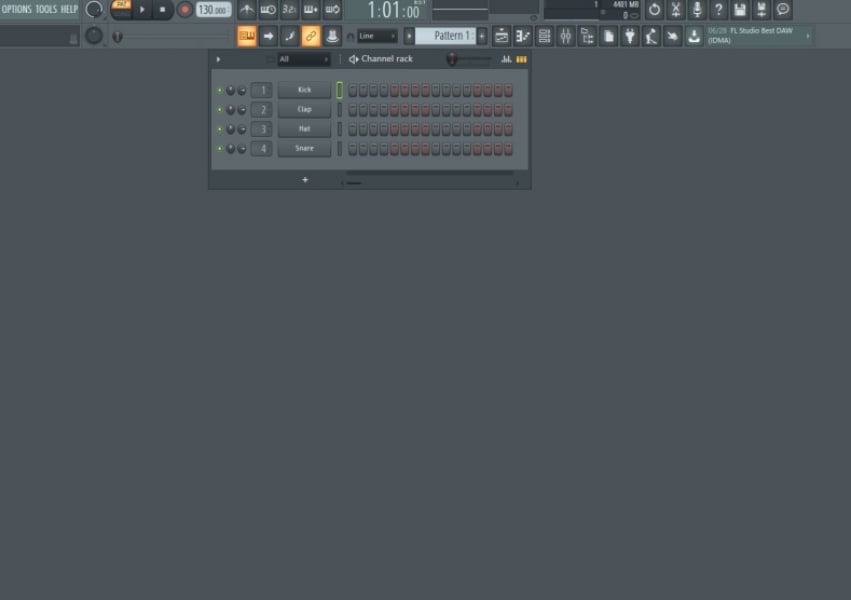
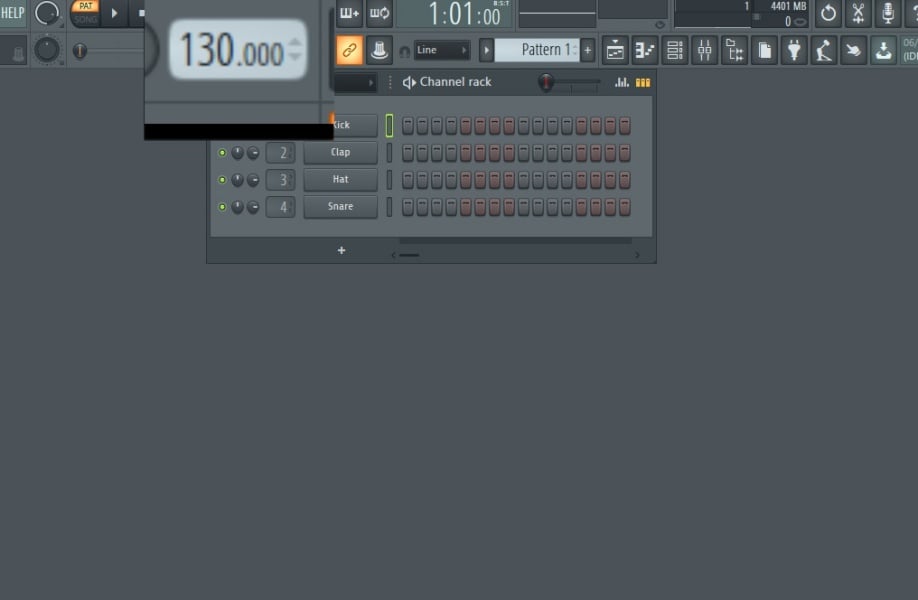
This is the tempo. You can change it up or down. By default it will start up at 130.
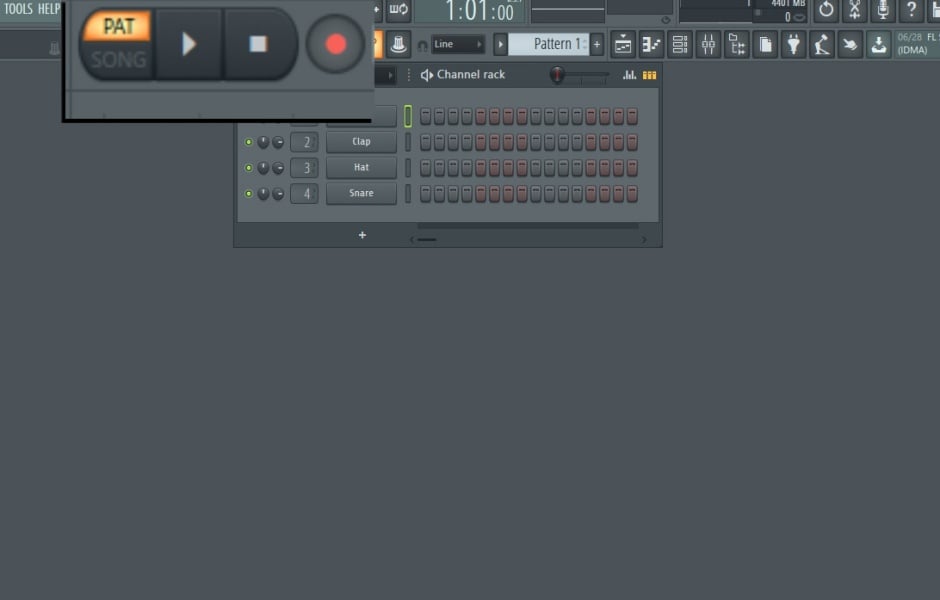
This cluster holds the play, stop and record buttons. The button that is in orange indicates that if you were to press play you would hear the current pattern. The one below it when pressed will turn green and indicates that if you press play you would hear the song.
This is the next cluster of buttons. When the button is pressed and active it will turn orange. You can show or hide each option by selecting or deselecting the button.

The first button will display the playlist view.
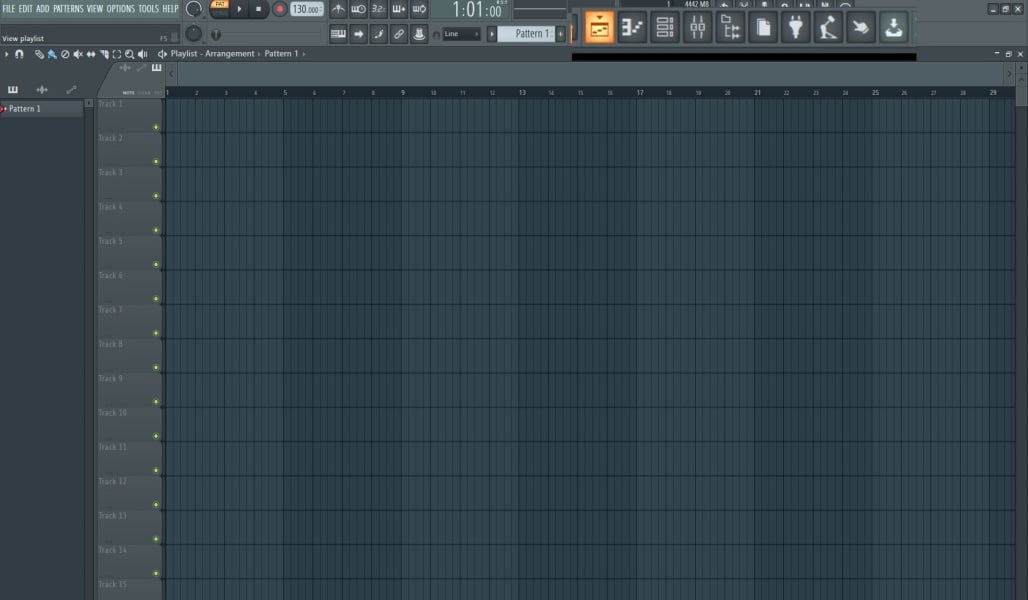
The second button shows the Piano Roll view.
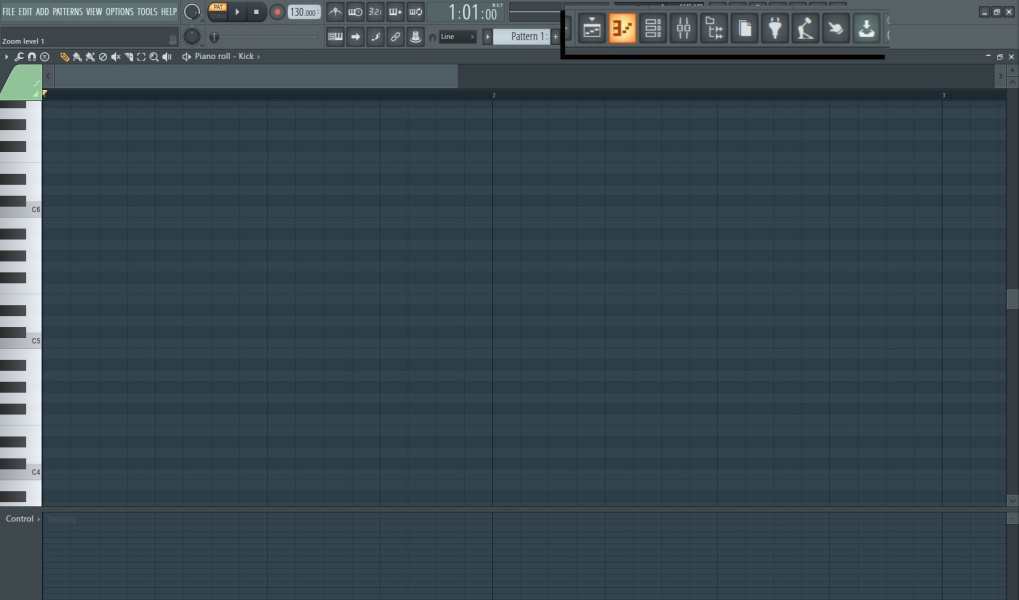
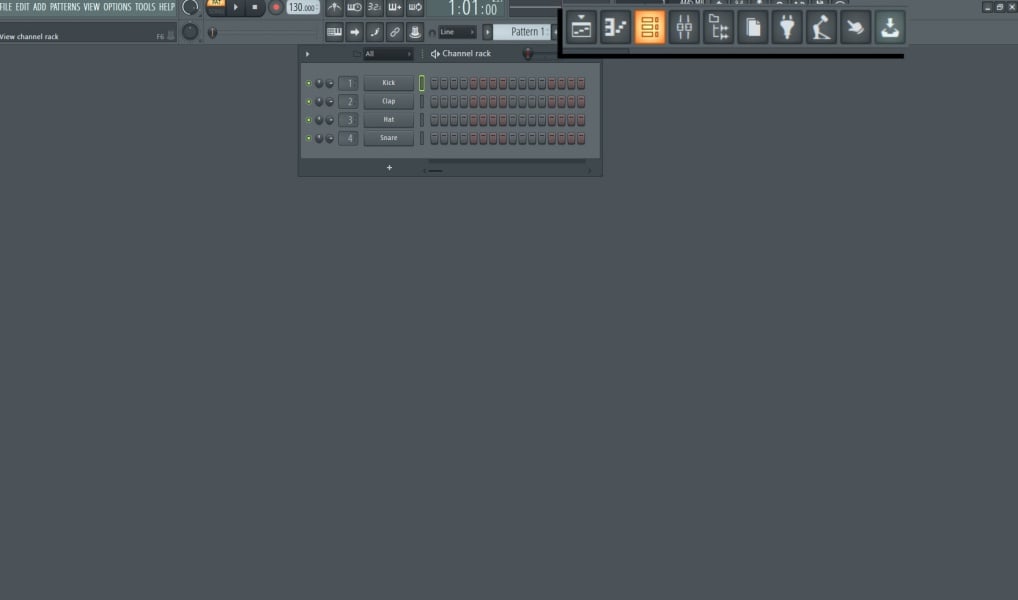
The third shows the channel rack.
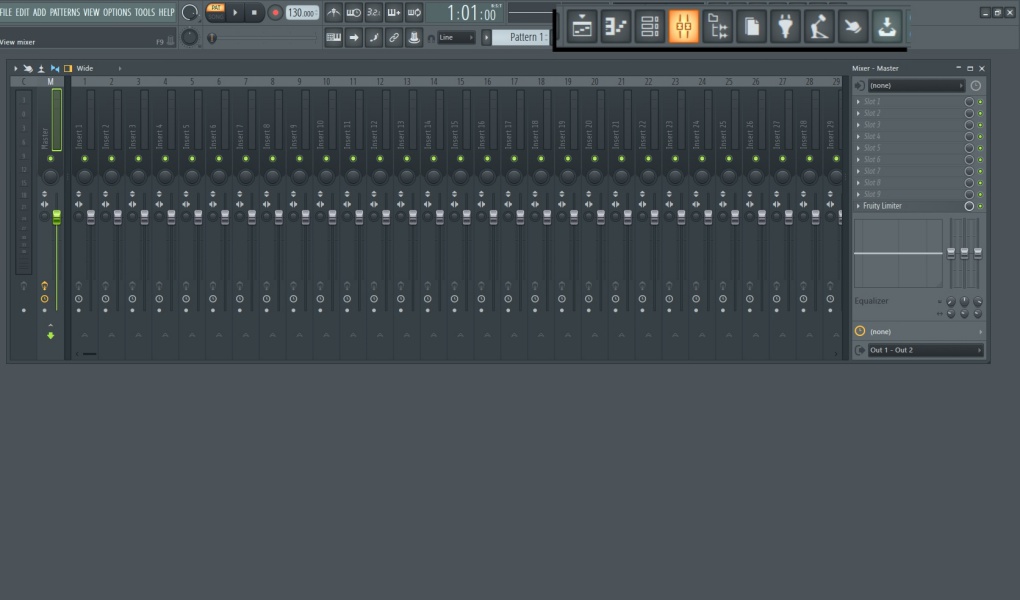
The fourth button shows the mixer.
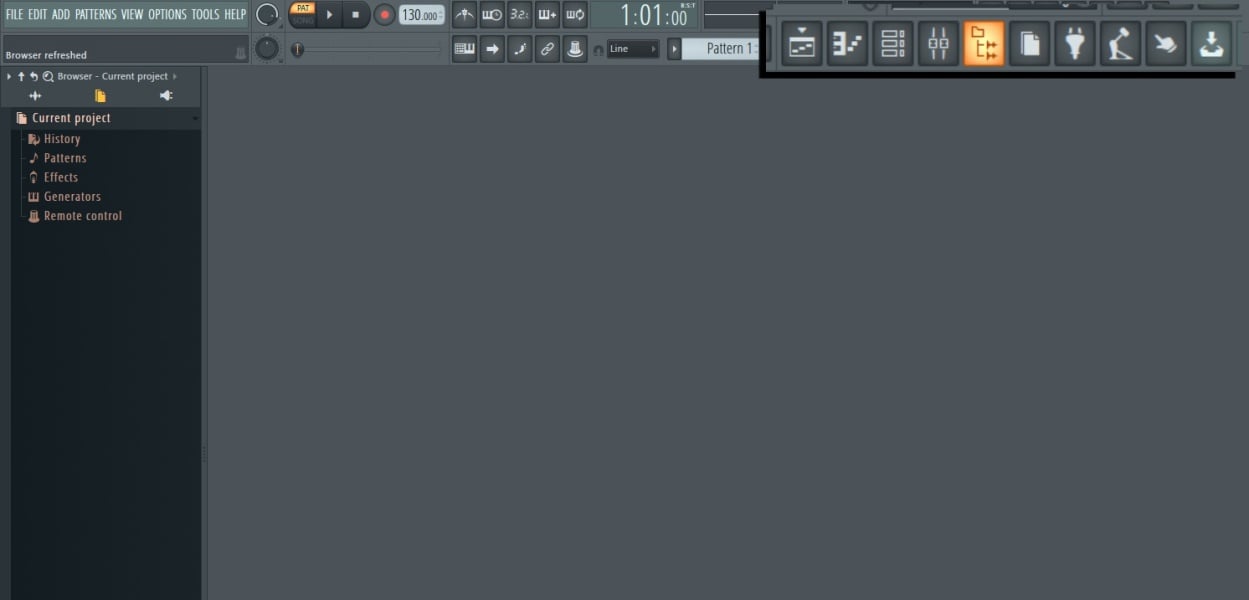
The fifth button displays the library. The library holds samples, loops, effect plugins, instrument plugins and also lists your projects.
You will be using the channel rack to create loops and those will then be placed into the playlist. The playlist is where you will build your track.
Let's see all these functions in action.
CREATE A BEAT
Starting with the provided sounds that load up in the channel rack we can create a simple drum beat.
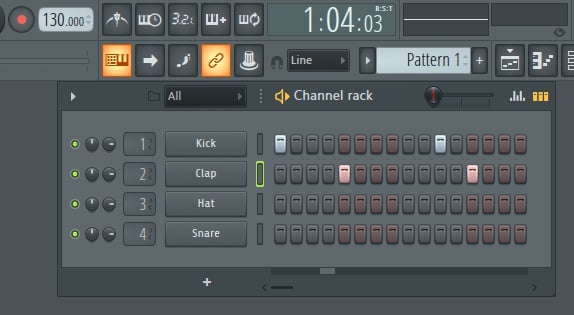
Each sound has 16 buttons divided into 4, 4 times. Meaning it is in 4/4.
As you can tell I am in Pattern 1. You can trigger the sounds by simply clicking on the button of your choice. Below I created a simple beat.
I have selected the playlist and placed pattern 1. To make it repeat I simply insert the pattern as many times as II would like, side by side.

From this screen I can right click and rename the slot to indicate it is “drum beat 1”
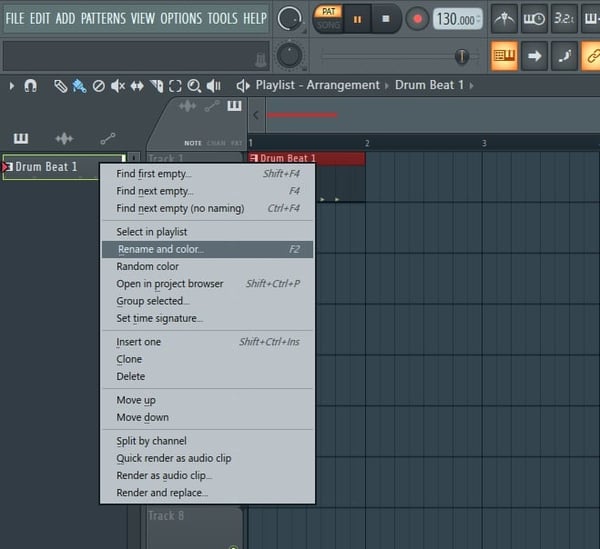
Deselecting the playlist button I have now returned to viewing the channel rack. To create a new pattern I have gone up to the pattern selector and selected the + symbol. It will then ask you to name. You do not have to name it, you can just accept it as Pattern 2. When you have multiple patterns, selecting the indicator will then provide a drop down list of all your patterns.
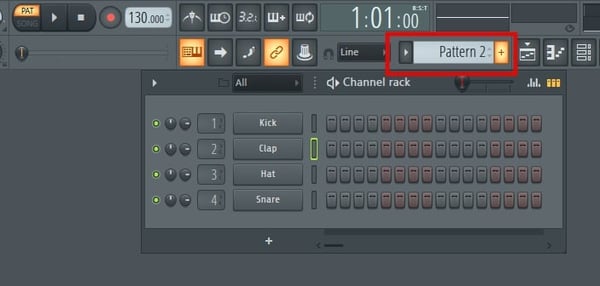
To add a channel, an instrument plugin, select the + symbol at the bottom of the channel rack.
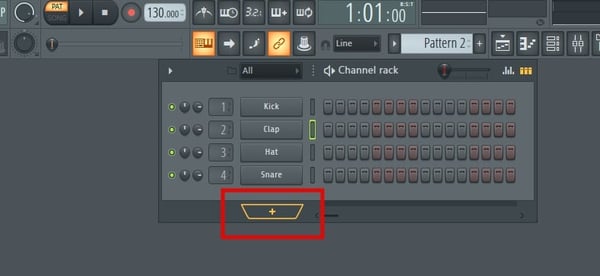
When you do this a menu will show you all of the optional plugins. These are organized by type.
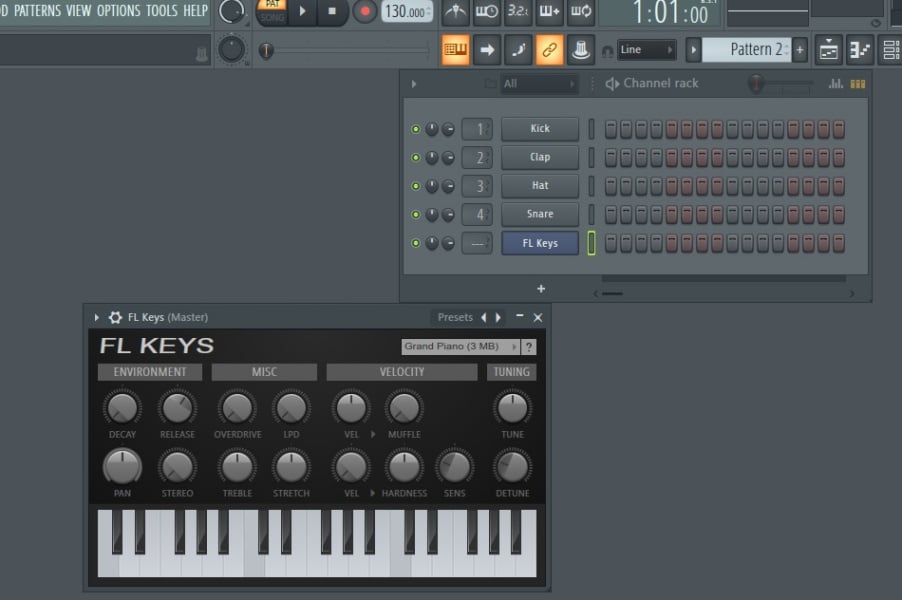
I selected Fruity Keys. This plugin provides a basic piano sound.
You will be able to use your computer keyboard to generate sound.
In order to program the notes you wish to be played select the instrument tab in the channel rack and right click. A menu will appear.
The first option is “Send to piano roll.”
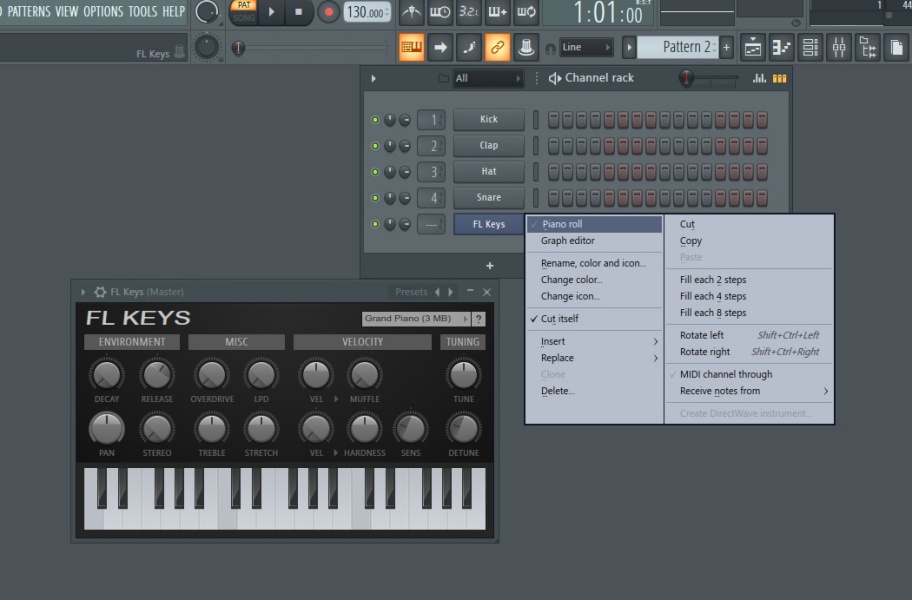
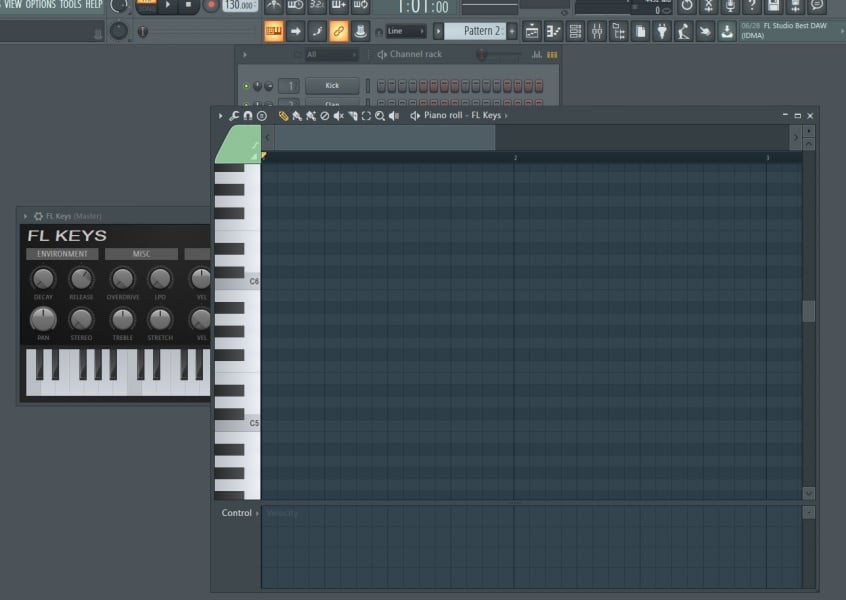
The piano roll is now open. The piano roll consists of a full keyboard. The default shows C5. By scrolling down it will go to C1 and by scrolling up it will go C10. Just like a real piano keyboard it spans all notes from low to high. All of they keys are also labeled with their corresponding note.
When enlarged you can see the keys you play on the computer keyboard become highlighted in orange in the piano roll.
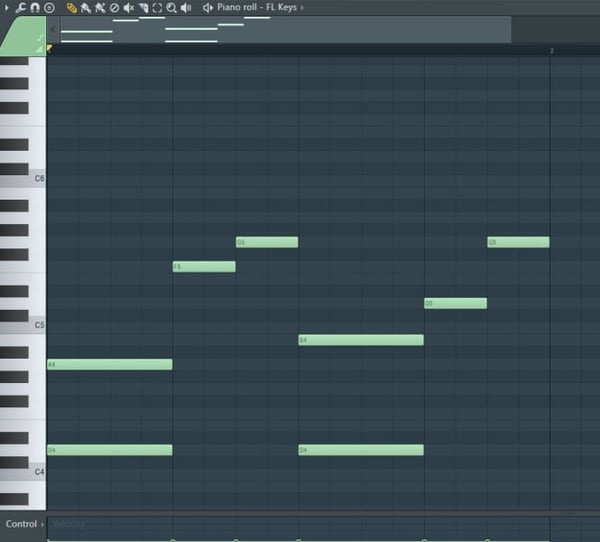
I have placed some notes in the piano roll. By clicking in the box of the note you want a green box will appear. You can change the duration of the note by clicking on the right hand side of it and dragging it left or right.
Selecting the play button at the top of the interface as we saw earlier will play the notes in this pattern.
I have selected that the playlist is shown and have inserted pattern 2 into the playlist. I have designated that it played at the same time as my drum beat.
To hear them play together, the orange light near the play button needs to be changed to SONG. Song is the button directly below it. When it is active in Song mode it will turn green.
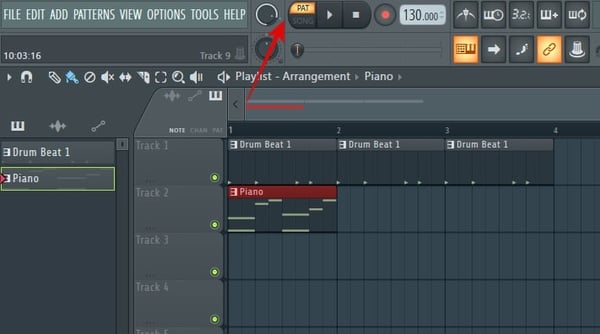
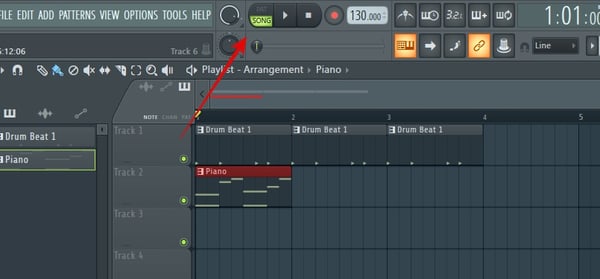
Now when I select play, I will hear my drum beat and piano line play one time together. My drumbeat will continue to play 2 more times by itself. In order to insert pattern clips into the playlist, the desired pattern number or name must be showing. You can drag these patterns anywhere in the playlist. To delete a pattern, simply right click.
RECORDING
There are some things you must consider before recording live instruments in FL Studio.
- You must have producer edition or higher.
- As an input device, you must select ASIO
- The source must be connected to your input device.
- Edison must be set to record audio on the input Mixer track or the Mixer track must be armed to record audio
Open the mixer and select a channel. Do not choose the Master. Make sure to select “arm for record.”
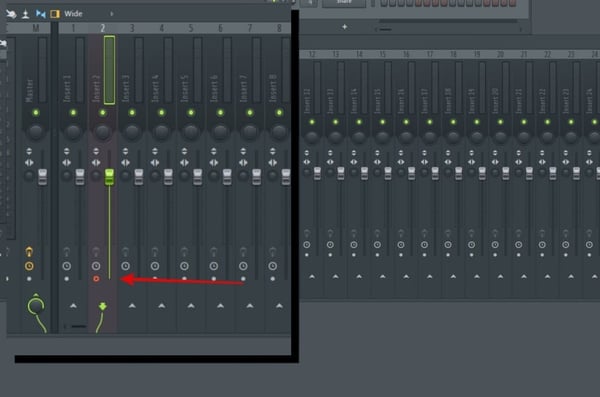
On the upper right side of the mixer select your input device.
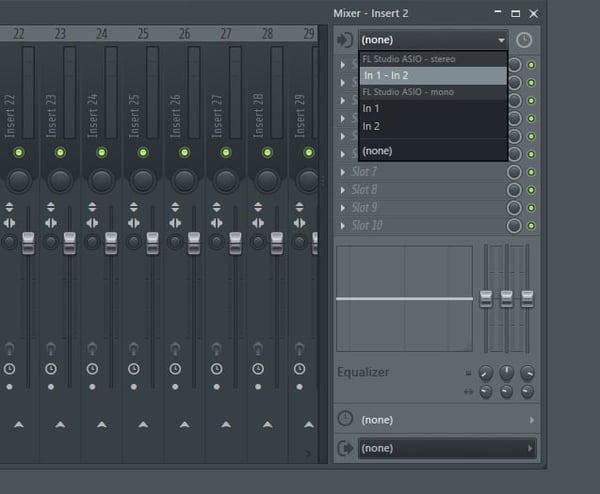
Below that you will see numerous slots. Select position one. Click on it and you will see a menu open up. Select “Edison.”
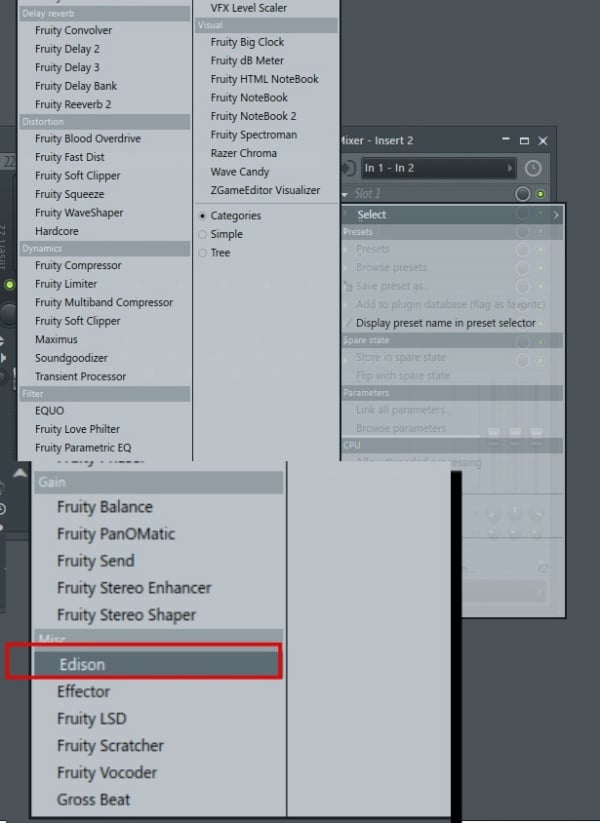
In Edison select record.
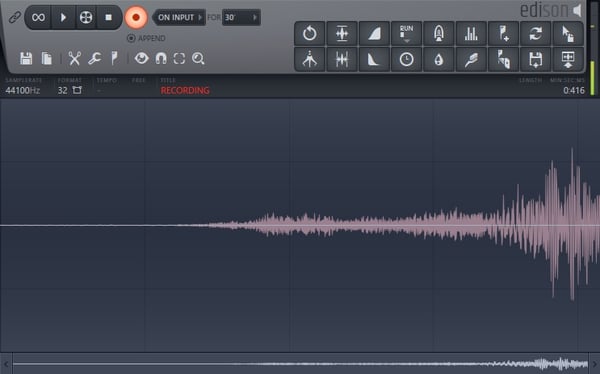
When done, on the far right corner select send to playlist or channel.
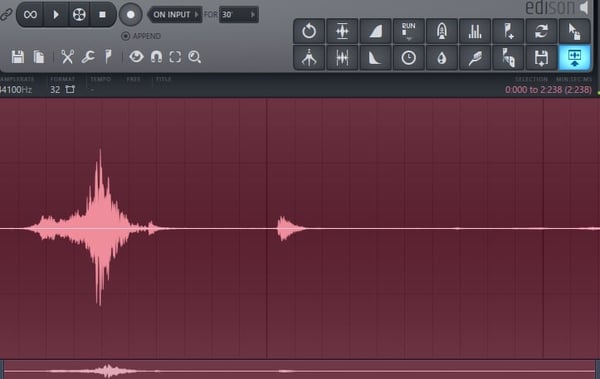
When you open the playlist you will then see your recording.
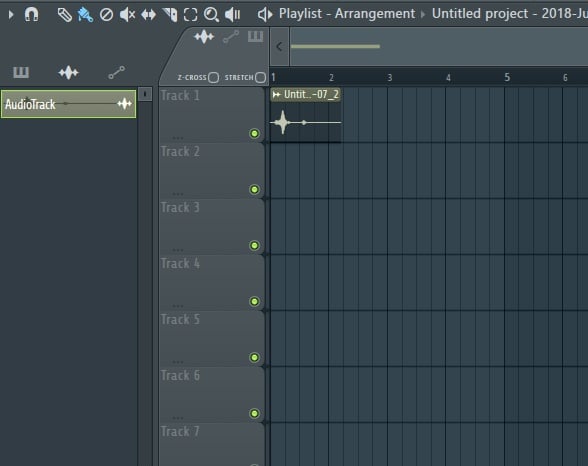
Important things to remember when recording.
Test your levels.
You never want to see the loudest sound go into the red. This is called “peaking” and will cause distortion. If you find your input is too loud, adjust the audio interface volume.
Now you have the tools to get FL Studio, you have a good understanding of the main features and functions of the interface, can create a beat, insert plugin instruments and record live instruments.
RENDERING
Once your song is complete and you are ready to render the final version how do you get all those individual tracks into one master? What format should you use?
No problem.
First, you need to understand a little about file formats and how they affect your final version.
Lossless Audio and Lossy Audio.
Uncompressed Audio - This format means that no compression has taken place. This is a raw audio format. The file size can be rather large, however, no data has been lost due to compressing the file. One major uncompressed audio format, LPCM, is the same variety of PCM as used in Compact Disc Digital Audio. The most commonly used audio format you may be familiar with is. WAV. All though the file size can be large this is the format you would want to render your final mix. You can always create alternate formats.
Lossless Compressed - This format stores data in less space without losing any information. The original, uncompressed data can be recreated from the compressed version. These formats include FLAC and ALAC for Apple Lossless.
Lossy Compression - This format makes the file size smaller but does reduce audio quality. MP3 format is the most widely recognized lossy compression format, but the AAC format found on the iTunes Music Store is also common
To render your final version follow these steps.
Go to the upper left hand corner and select File. Export.
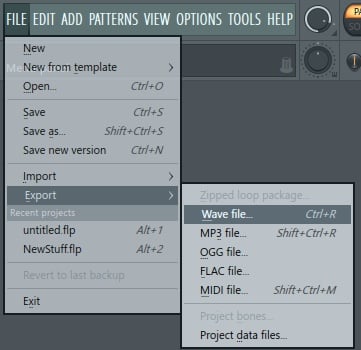
Select your format.
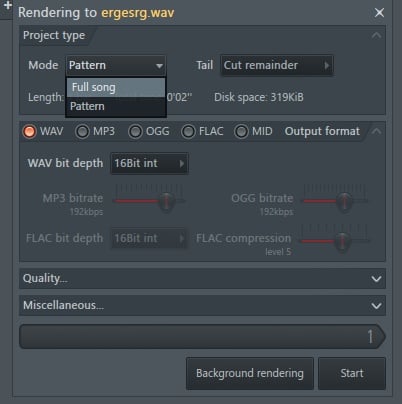
Select Pattern to render 1 pattern and full song to render the entire playlist.
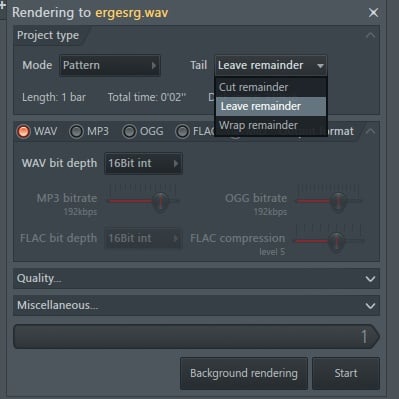
The section labeled “tail” give the following options cut remainder, leave remainder, and wrap remainder. If there is a sound remainder at the end of your project crossing the bar line (such as a long reverb sound), “cut remainder” cuts it, “leave remainder” leaves it as is, and “wrap remainder” overlaps the remainder onto the beginning of your sound file.
WAV Bit Depth
A CD will host 16-bit audio. Whereas iTunes and DVD audio support up to 24 bits. 24 bits can accommodate a larger dynamic range. For CD you can render your audio at 16 bit. When you render your audio for online distribution, go for 24 bit to capture all of the dynamics in your music.
MP3
You can choose to render an MP3 by turning on or off the button located below the Bit Depth selection. The bit rate is the number of bits per second encoded in the MP3 file. Using a bit rate of 128 Kbps usually results in a sound quality equivalent to what you'd hear on the radio. Many music sites and blogs urge people to use a bit rate of 160 Kbps or higher if they want the MP3 file to have the same sound quality as a CD. 320kbps songs are crispier, loud and more detailed.
320kbps take up a lot of memory space compared to 128kbps.
320kbps has a much wider range of frequencies than 128kbps.
Some will argue whether or not you can hear the difference when rendering at 320kbps. When you are dealing in loops, samples, and electronic music, if you plan on doing any edits to the sound, you will want to render at 320kbps. Websites that host audio and require MP3 format will require a higher bit rate. So, just to be safe, stick with 320kbps, but never use it as your final master mix.
WRAPPING IT UP
Is your brain about to explode? I know that was a lot of information.
But hey, now you know how to start producing music in FL Studio.
With all the instruments, effects, and features FL Studio has to offer your creative possibilities are endless. Learning how to use all these tools are up to.
Another way we want to help you succeed is by offering a great point of reference that you can come back to and find all that you need.
Below you will find those resources.













_Cropped.png?width=1600&name=02%20(2)_Cropped.png)






Your Comments :