


For many producers - professional or bedroom - the mastering phase is the most crucial and exciting part of their creative process. At this stage, all compositions and arrangements have their place, and every part of the mix is ready to be livened up as a singular final track. Mastering can vastly determine the overall quality of a track, especially if implemented incorrectly. In this article, we’re going to run you through the fundamentals of mastering, and show you a handful of tips and tools that you can use to master your own or someone else’s songs. By the time you reach the other side of these paragraphs, you should be able to compile and effectively utilize your mastering chain.
Mix Checks Before Mastering
Before reaching for any device or plugin for mastering, it’s incredibly important to run a list of final mix checks. Often during the mixing process, our ears can become worn and miss certain mistakes or irregularities within a mix. Compiling a checklist of mixed tasks will help you ensure that you don’t overlook any errors that your ear might miss. A simple mix list should look something like this:
Has every element been checked for pitch and timing?
Has every element been checked for volume/ gain staging?
Does the mix have a balanced stereo image? (Check your tracks in mono for optimum clarity)
Is every element clear and audible to taste? (this can be attenuated with some EQ and compression.
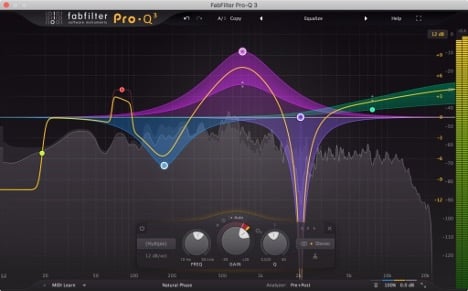
EQ - FabFilter Pro Q-3
Any song that feels soothing or inviting on the ears from a sonic perspective - most certainly has achieved this state through good equalization. Placing an EQ on your master chain will provide the tools needed to sculpt the sonic shape of your song. It’s best to use EQ gently at this stage of your mix, as you are treating every element as a whole, instead of treating each individually. Any excessive scoops or notches will cause overly drastic changes in your master and create an awkward stereo image.
FabFilter’s EQ has become somewhat of an industry standard for audio engineers when tracking, mixing, or mastering. The device is incredibly simple to use with an attractive GUI and a great list of presets - including some wonderful mastering presets that are perfect for first-time users. The ProQ comes with dynamic EQ settings that allow much more motion and dynamics than standard EQ. There are also mid/side and left/right EQ modes which are prime for mastering, as well as a quick solo mode toggle for precise corrective treatment.
Compression - Waves H-COMP
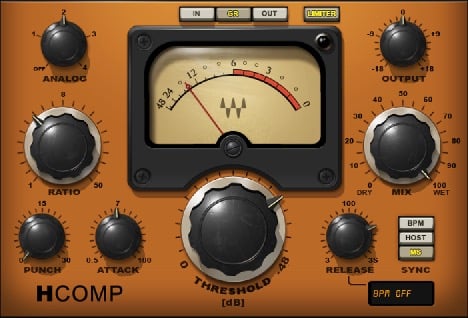
Compression determines the general punch and dynamics of your final master track. Much like EQ - this process can be quite volatile, and can either drastically improve or diminish your mix depending on the execution. The attack and release parameters used in this instance should be set to higher values, as anything too low will cause the track to sound squashed and muffled. By opening up the attack and release, you’ll allow more information to pass through the compressor consistently while also boosting any smaller elements that might need a slight volume bump. It’s also important to not have a compression ratio higher than 2:1 as overcompressing will cause the track to distort.
The H-Comp plugin by Waves offers users a simple but highly effective compression tool for mastering. The device comes with all standard compression parameters - Attack, Release, Threshold, Ratio, and Mix - each of which is wonderfully reactive to touch. One of the plugin’s more powerful secret weapons is the ‘Punch’’ dial. When used minimally on a mastering chain, this control can add just the right amount of extra bounce and dynamics to a final mix.

Color / Presence - KSHMR Essentials by WA Production
Once you’ve done the majority of your basic shaping and dynamics through EQ and compression, you can add a variety of other devices to add or introduce some character to your master track. This phase of mastering is a lot more subjective than EQ and compressions, The goal here is not centered around audio quality. The primary objective here is to determine your personal choice of texture and color for your track as a whole. Some producers/engineers heavily favor a classic or retro feel to their mix. Others enjoy a cleaner, more digitized modern sound. Whichever creative route you take with your master, coloring, and presence is sure to play a distinctive role.
It can be quite tedious to decide which effects to use for adding character to your track. WA Production has streamlined this process for us in the form of the KSHMR Essentials toolbox. The device is a multi-fx rack that is built with the mastering process in mind - and offers premade settings for drums, vocals, synths, kicks, and bass respectively. This device features 8 dials that blend in various effects for coloring:
Air - Adds presence to the upper-mid frequencies of your signal
Body - Boosts the mid and lower-mid frequencies without muddying up your mix.
Details - Introduces frequency boosts over certain areas of your mix to help add clarity.
Pressure - Acts as a mild compressor for added dynamics.
Trans - A transient shaper for adding or removing sustain from certain mix elements.
Tape -This dial acts as a saturator and is possibly the most powerful feature of the plugin. Magnificent for anyone looking to create a more vintage feel with their master track.
Width - This control functions as a stereo imager and is perfect for adding some breathing room between mixed elements.
Glue - A simple compressor that adds cohesion between all compositional elements.
Limiting - Sonnox Oxford Limiter - Universal Audio
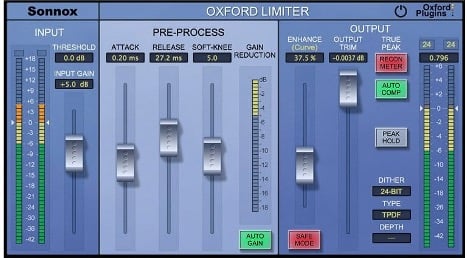
Limiting is possibly the single most important stage of your mastering process. Compressors and limiters often work in conjunction with each other to determine a master track's overall punch and impact. A limiter is generally placed at the end of a mastering chain. The device’s primary functions are to increase loudness, but it also takes any excessively loud elements and lowers their volume. Limiters place a final layer of crucial enhancement on your master track, and the process is essential for anyone that wants to achieve adequate loudness with their master.
Sonnox’s Oxford Limiter is one of the old guards of the modern mixing world and is still quite highly recommended by most top-tier mix engineers. The device measures true peak response as opposed to the sampled peak response captured by most digital limiters. Included in the GUI are full attack, release, and threshold controls for pinpoint accuracy when treating your master. Less experienced producers/engineers should make use of the handy auto gain feature - which does a great job of capturing your master track’s overall dynamics. The Oxford Limiter also comes with an ‘’enhance’’ function. This feature is not common amongst most limiters but works wonderfully with this device to breathe some extra life into a track’s dynamic range.
Final Thoughts
It’s important to note that you can build a mastering chain in the same order as the above-listed steps. This type of configuration will provide a vast degree of shaping control across every major crucial mix element in your track. It’s also equally important to use these tools with a sense of experimentation once you have mastered their fundamentals. It’s these types of experiments that create the next ‘’hot’’ sound that could change the course of music production as we know it. Thanks for reading through our quick guide to mastering.
_Cropped.png?width=1600&name=02%20(2)_Cropped.png)


Your Comments :